
 Would you like to know more about the traffic visiting your Blogger blog (Blogspot Blog)? Feedjit is a free tracking tool that tracks visitors to a blog in real time and identifies what pages are visited. In this Blogger tutorial you will learn how to add a Feedjit widget to your blog which will track where visitors originate from and what pages they viewed. Adding a Feedjit widget to your Blogger blog is easy and takes less than 5 minutes. This tutorial is suitable for all Blogger bloggers (Blogspot beginners). Updated 10 October 2009.
Feedjit monitors traffic to your site and ranks it based on popularity and relevance against the traffic received by other Feedjit users in your local area. There is a choice of 4 different widgets: Live Traffic Feed, Live Traffic Map, Recommended Reading, and Page Popularity. Each of these widgets has different functions.
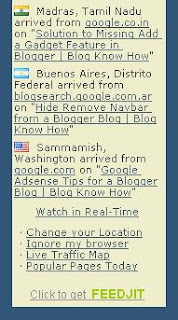
Feedjit Live Traffic Feed Widget for Blogger
Places a widget on your Blogger blog of the last 10 visitors. By clicking on the real time link you can actually view the last 50 or so visitors along with the keyword search phrase used to find your site. The Feedjit's Live Traffic Feed shows statistics in real-time about:
The city and country your visitors are in
The website they arrived from, if any
The page they visited on your website
Which external link they clicked to leave your site, if any
Feedjit Traffic Map
The Traffic Map widget places visitors to your site on a world map according to their physical location
Feedjit Recommended Reading
The Recommended Reading widget makes suggestions to visitors about what other blog posts they might be interested in based on general page popularity
Feedjit Page Popularity
The Page Popularity widget lists the 10 most popular pages that have been accessed by visitors on that day.
How to Add a Feedjit Live Traffic Feed Widget (Gadget) to Blogger
- Visit Feedjit
- Select Live Traffic Feed.
- Click on the Customize It link under Live Traffic Feed. This will allow you to enter colors to match the theme of your blog. If you are in doubt I have found that the easiest method to get the custom colors of a site is to go to the Layout > Page Elements screen in Blogger and click on Add a Gadget and then Adsense. From the configuration screen that pops up you can get the colors of the background, border, title (heading in Feedjit), URL, text. If you use these same colors in your Feedjit widget it will blend in with the rest of your site. You can preview your widget to make sure it looks as you would like it before adding it to your blog.
- To automatically add the widget to Blogger select the Click to Add to Blogger Link and follow the instructions. Or to manually add it which I myself prefer right click the code in the box under the heading Live Traffic Feed and select copy.
- Navigate to Layout > Page Elements in your blog if that page is not already open
- Select Add a Gadget in the Sidebar and then HTML/Javascript
- Paste the code by placing the mouse in the box and right clicking and selecting paste
- Save the widget and then using the drag and drop feature of Blogger move it to your desired location. Note HTML/Javascript widgets are best placed after your other widgets for faster loading.
- Save Template
- Click on View Blog to view your newly created Feedjit widget
- Click on Options in the Feedjit widget and then Ignore My Browser otherwise the widget will record your visit each time you view your blog. The option on the widget will now change to Stop Ignoring Me which you can reverse by clicking on the link again.If you use more than one browser you will need to tell Feedjit to ignore you for each browser.
This Blogger tutorial has discussed how to add a Feedjit Live Traffic Feed widget, gadget or button to Blogger to track where visitors are being directed from and what posts they are most interested in. A Feedjit Live Traffic Feed will help you learn about the visitors to your blog and what search phrase they used to arrive. To add a Feedjit Live Traffic Feed widget to Blogger is simple and takes less than 5 minutes to install.
Related Articles
Add Google Analytics to Your Blogger Blog
Track Visitors to Your Blogger Blog
List of How Blog Works Tutorials for Blogger Blogs
Guide to Blogger Frequently Asked Questions
No comments:
Post a Comment