Showing posts with label Customise Blogger. Show all posts

Sunday, September 04, 2011


Add a Post Divider Between Blogger Posts

In today's Blogger tutorial I show you how to enhance your Blogger blog (Blogspot blog) by adding a post divider to your Blogger template. Used effectively post dividers can really jazz up your blog and will lend it that individual feel which most of us are hoping to create. 

This tweak is very easy and well within the capabilities of any Blogspot blogger. Only a few simple changes to your Blogger template are required and these are in the CSS styling section.


By way of example I will use a divider that I downloaded from the internet free by searching for free divider graphics. Here are some sample dividers you can use to get started:


URL address:
https://blogger.googleusercontent.com/img/b/R29vZ2xl/AVvXsEjr8_1EklQciC3zXz2htRixi1q2ZDNNDDfjbRj3X46HWRkavQcMsV6SO-8KhvqMLHww8nX5wo2LhRk4mciyl9cS3WM2uCYg1KnzjTpGZ65V8wGPNSN6FpUKFe2NkYDKKslSuixpqWH_JffD/s320/ribbon%255B1%255D.gif


URL address:
https://blogger.googleusercontent.com/img/b/R29vZ2xl/AVvXsEi-T0h_MRBO7M43KwgfnuiTWEnHFodQTKQImgG1jZVjWFoip5YmQ4j5fU8N_jlThDOrN6Sf855PeYqMxQzTNmLWcr3nIrvERpGMkGLMFrt8O4ICUvfmGwxi2lYSs8wTG-z3AUEtN8CZDTWv/s320/bar1%255B1%255D.gif


URL address:
https://blogger.googleusercontent.com/img/b/R29vZ2xl/AVvXsEhEfRUVTK5IBlCyvkCBfo9TIOiAOnuESPuzVrtDNVbsSV7vnDWMcOY4eGQPvk6xvahYgIHuCFJBmjNTv1VpaxneJjVTG7tZYwWuJ2Qjuk1B5fj0E5LCRQKDqXrJH6spam83Y5dFSt8IcX84/s320/barbsmpl%255B2%255D.jpg


URL address:
https://blogger.googleusercontent.com/img/b/R29vZ2xl/AVvXsEhTnAUsxZzQ3XsRisy8-8Q7SbK_XA1J1CLsHYt0m4Oj1whkivzzoRBDi3C2f2gMImr8bSCQPWLeLVrNDPyOwnZXWQ3r3NkCWMod5LrAcQgDDES9JS0HGbarxN1Ww9_-XtXtwjUSjjp2KKqR/s320/bar47%255B1%255D.gif


How to Add a Divider Between Posts in Blogger

  1. Login to Blogger if not already logged in
  2. From the Dashboard navigate to Layout > Edit HTML
  3. Back up your Blogger template as a precaution by downloading it to your computer
  4. Find the following line of code in your template:


    .post {


    You are likely to have something like this in your template already:


    .post {
    margin:.5em 0 1.5em;
    border-bottom:1px dotted $bordercolor;
    padding-bottom:1.5em;
    }

  5. Paste the following lines of code to this block making sure you paste them before the closing curly bracket:


    background: url(https://blogger.googleusercontent.com/img/b/R29vZ2xl/AVvXsEjr8_1EklQciC3zXz2htRixi1q2ZDNNDDfjbRj3X46HWRkavQcMsV6SO-8KhvqMLHww8nX5wo2LhRk4mciyl9cS3WM2uCYg1KnzjTpGZ65V8wGPNSN6FpUKFe2NkYDKKslSuixpqWH_JffD/s320/ribbon%255B1%255D.gif);
    background-repeat: no-repeat;
    background-position: bottom center;
    margin:.5em 0 1.5em;
    padding-bottom:1.5em;

  6. If any lines are duplicated remove them.
  7. Remove any line beginning with: border-bottom: eg


    border-bottom:1px dotted $bordercolor;

  8. You will now have a block of code which looks like this plus any extra lines from the existing code in this block:


    .post {
    background: url(https://blogger.googleusercontent.com/img/b/R29vZ2xl/AVvXsEjr8_1EklQciC3zXz2htRixi1q2ZDNNDDfjbRj3X46HWRkavQcMsV6SO-8KhvqMLHww8nX5wo2LhRk4mciyl9cS3WM2uCYg1KnzjTpGZ65V8wGPNSN6FpUKFe2NkYDKKslSuixpqWH_JffD/s320/ribbon%255B1%255D.gif);
    background-repeat: no-repeat;
    background-position: bottom center;
    margin:.5em 0 1.5em;
    padding-bottom:1.5em;
    }

  9. Click on Save Template to save your changes
  10. Click on View Blog to see your new post divider between posts

Tips and Troubleshooting
  • To change the divider to one of the above replace the URL address of the image (in red) with the URL address of the new image you want to use.
  • To use your own divider image download to your computer from the internet and then save the image to a photo image service like Photobucket. Replace the divider image URL address (in red) with the URL address of your new image
  • To increase the padding around the divider change the following line of code:


    padding-bottom:1.5em;


    to


    padding-bottom:2.5em;


In today's Blogger tutorial you have learned how to insert a divider between your Blogger posts to enhance the look of your Blogger template (Blogspot template). You can either make your own post divider or download one from the myriad of free website dividers available on the net.

Related Articles
List of How Blog Works Tutorials for Blogger Blogs
How to Add, Delete or Remove Blogger Image Borders
How to Align and Justify Posts in Blogger
Read Full Post ...


How to Align and Justify Blogger Posts

This is the second article in a series about CSS styling tricks and tips for Blogger written with Blogger beginners and novices in mind but suitable for all bloggers who want to customize their existing Blogger template. While the first article dealt with how to add or remove image borders in Blogger today I show you how to align and justify Blogger posts.
Skill Level: Beginner Rating: Easy Time: 1 Minute

Many of the questions that my readers ask me are about how to customize various features of their Blogger template (Blogspot template). Over the coming weeks I will be focusing on some simple CSS styling tricks and tips to help you get more out of your Blogger template. Much can be achieved by learning a little about CSS. So before you rush off to download a custom Blogger template consider customizing your existing Blogger template.

This tutorial is part of a series of articles that I will publishing over the coming weeks about customizing your Blogger template using CSS styling. I will be targeting beginner bloggers and newbies to Blogger as well as more seasoned bloggers so if you want to spice up your Blogger template please read along.

How to Justify Blogger Posts (Blogspot Posts) Using CSS
It is easy to change the text alignment of your Blogger posts with the addition of one extra line in the CSS styling section of your Blogger template (Blogspot template). By default the alignment is set to left align so that the text aligns to the left while the right edge is ragged. You can also have right alignment where the text aligns to the right and the left edge is ragged.

Another not so common option is to justify the text so that both left and right edges are straight. Users of MS Word and other word processing programs will be familiar with justify as an alignment choice. Justify stretches out the text so that each line has an equal width similar to what you will find in newspapers and magazines. I have found justifying my Blogger posts to be a useful feature on several of my blogs and thought some of you might to. Below are instructions on how to justify your Blogger posts so that all your blog's articles are justified but first take a look at the difference in presentation of these 2 blog posts just by justifying the alignment of the text. Makes a big difference don't you think?


  1. Before you start check how text is currently aligned on your Blogger posts. If it is left aligned you will be able to follow this trick to justify it. If it is already justified no need to go any further.
  2. Login to Blogger if not already logged in
  3. From the Dashboard click the Layout link for your blog and then click on Edit HTML
  4. Back up your template by downloading it in full as a precaution
  5. Use CTRL + F to find the code block beginning with .post in the CSS styling section of your Blogger template. As templates will differ greatly there are no hard and fast rules about what styling will be in this block. Here is a typical code block taken from the default Minima Blogger template


    .post {
    margin:.5em 0 1.5em;
    border-bottom:1px dotted $bordercolor;
    padding-bottom:1.5em;
    }

  6. Add the following line to the code block before the end brace (the end curly bracket)


    text-align:justify;

    so that your code now looks like:

    .post {
    margin:.5em 0 1.5em;
    border-bottom:1px dotted $bordercolor;
    padding-bottom:1.5em;
    text-align:justify;
    }

  7. Click on Save Template
  8. Click View Blog to see the alignment of all your posts has now changed to justified

Tips and Troubleshooting
  1. If your Blogger template justifies posts and you would like to left align them find the code beginning with .post in your Blogger template and add the following line to the block:


    text-align:left;

    so that your code now looks like:

    .post {
    margin:.5em 0 1.5em;
    border-bottom:1px dotted $bordercolor;
    padding-bottom:1.5em;
    text-align:left;
    }

  2. If you want the posts right aligned you would substitute the word right for left.

In this tutorial you have learned how to justify your Blogger posts to create a straight rather than ragged margin edge. By using this tip to add one line of code to your Blogger template you can enhance the look of your Blogger posts. This tweak only takes a minute but can markedly improve the presentation of your Blogger posts. Please keep reading along for more CSS tips and tweaks in the coming weeks.

Related Articles
List of How Blog Works Tutorials for Blogger Blogs
How to Add, Delete or Remove Blogger Image Borders
Read Full Post ...

Friday, September 02, 2011


Add 3 Column or 4 Column Footer to Blogger

In this Blogspot tutorial you will learn how to convert your existing Blogger footer (Blogspot footer) into a 3 column footer or a 4 column footer. With more columns in your Blogger footer you will be have the extra room to accommodate more widgets such as Flickr photos and Twitter updates. Also you will be able to put less frequently used widgets such as recents comments, archives, followers, About Me etc at the bottom of your template so that only the most important widgets are loaded first.

This tweak involves adding code to the footer section of your existing Blogger template to change it to 3 columns or 4 columns. The tutorial is not beyond the capabilities of Blogger newbies and webmasters with intermediate skills but care needs to be taken when modifying your Blogger template so back up before you start. For best results a Blogger template with a width of around 900px is best.


How to Add a 3 Column Footer to Blogger

  1. Log in to Blogger if not already logged in
  2. Navigate to Layout > Page Elements
  3. Move any existing widgets out of the footer section and place them in the sidebar temporarily and save changes
  4. Navigate to Layout > Edit HTML
  5. Back up your template as a precaution by downloading it to your computer
  6. Find the following section in your Blogger template


    <div id='footer-wrapper'>
    <b:section class='footer' id='footer'/>
    </div>


    If you are having difficulty finding this section trying searching for footer-wrap or something similar as sometimes this section is called something else in some templates.
  7. To Add a 3 Column Footer to Blogger
    Replace all the code located in Step 6 with the following


    <div id='footer-columns'>
    <div id='footer1' style='width: 30%; float: left; margin:0; text-align: left;'>
    <b:section class='footer-column' id='col1' preferred='yes' style='float:left;'/>
    </div>
    <div id='footer2' style='width: 40%; float: left; margin:0; text-align: left;'>
    <b:section class='footer-column' id='col2' preferred='yes' style='float:left;'/>
    </div>
    <div id='footer3' style='width: 30%; float: right; margin:0; text-align: left;'>
    <b:section class='footer-column' id='col3' preferred='yes' style='float:right;'/>
    </div>
    <div style='clear:both;'/>
    </div>


    To Add a 3 Column Footer to Blogger with a Lower Footer Section
    Replace all the code located in Step 6 with the following


    <div id='footer-columns'>
    <div id='footer1' style='width: 30%; float: left; margin:0; text-align: left;'>
    <b:section class='footer-column' id='col1' preferred='yes' style='float:left;'/>
    </div>
    <div id='footer2' style='width: 40%; float: left; margin:0; text-align: left;'>
    <b:section class='footer-column' id='col2' preferred='yes' style='float:left;'/>
    </div>
    <div id='footer3' style='width: 30%; float: right; margin:0; text-align: left;'>
    <b:section class='footer-column' id='col3' preferred='yes' style='float:right;'/>
    </div>
    <div style='clear:both;'/>
    <p/>
    <div id='footer-bottom' style='text-align: center; padding: 10px;'>
    <b:section class='footer' id='col-bottom' preferred='yes'>
    </b:section>
    </div>
    <div style='clear:both;'/>
    </div>


    To Add a 4 Column Footer to Blogger
    Replace all the code located in Step 6 with the following


    <div id='footer-columns'>
    <div id='footer1' style='width: 25%; float: left; margin:0; text-align: left;'>
    <b:section class='footer-column' id='col1' preferred='yes' style='float:left;'/>
    </div>
    <div id='footer2' style='width: 25%; float: left; margin:0; text-align: left;'>
    <b:section class='footer-column' id='col2' preferred='yes' style='float:left;'/>
    </div>
    <div id='footer3' style='width: 25%; float: left; margin:0; text-align: left;'>
    <b:section class='footer-column' id='col3' preferred='yes' style='float:left;'/>
    </div>
    <div id='footer4' style='width: 25%; float: right; margin:0; text-align: left;'>
    <b:section class='footer-column' id='col4' preferred='yes' style='float:right;'/>
    </div>
    <div style='clear:both;'/>
    </div>


  8. Save changes to your Blogger template.
  9. Navigate to Layout > Page Elements. You will now see a 3 column footer, 3 column footer with a lower section or a 4 column footer depending on what option you chose.
  10. Move the desired gadgets to the new Blogger footer columns. Create new widgets to fill up the footer columns if necessary. Save your changes.
  11. Click View Blog to admire your new footer section

Tips and Troubleshooting

  1. To Add Padding Between Footer Columns in Blogger
    To create some padding between the columns add the following code to the style section of your Blogger template - before </b:skin> tag.

    #footer-columns {
    clear:both;
    }

    .footer-column {
    padding: 10px;
    }
  2. To Add a Border to the 3 or 4 Column Blogger Footer

    • For Top Border Only of the 3 or 4 Column Footer
      Paste the following code before the </b:skin> tag

      #footer-columns{
      border-top:1px dotted $bordercolor;
      clear:both;
      margin:0 auto;
      }

      Replace $bordercolor with a hex color if default color is not displayed. Change this color to suit your template. For example


      #footer-columns{
      border-top:1px dotted #113355;
      clear:both;
      margin:0 auto;
      }
    • For a Box Border Around the 3 or 4 Column Footer

      #footer-columns{
      border:1px dotted $bordercolor;
      clear:both;
      margin:0 auto;
      }

      Replace $bordercolor with a hex color if default color is not displayed. Change this color to suit your template. For example

      #footer-columns{
      border-top:1px dotted #113355;
      clear:both;
      margin:0 auto;
      }

In today's Blogger tutorial you have learned how to add a 3 column footer or a 4 column footer to your Blogger template (Blogspot template). You have also learned how to add some styling such as a border above the footer and around the footer. As always I am available to answer questions if you need assistance. Good luck!

Related Articles
List of How Blog Works Tutorials for Blogger Blogs
Customize Blogger Tips
Read Full Post ...


Add Email This Post Link to Blogger

In this article you will learn how to place an email this post link or button at the bottom of each post in a Blogger Blogspot blog.

You may have noticed that some blogs give readers the option below their posts to email the article to themselves or a friend via a link or button. This affords readers yet another way to have access to your posts and a link for them to find you if they want to call back.

This email link should not be confused with the subscribe by email link which once a reader is signed up to will give them regular updates of each post you publish. This email link on the other hand only emails the reader the single post they are interested in.

There are several ways to place an email this post link on your Blogger Blogspot blog. Here are three methods known to me.

Add Email This Post to Blogger - Method 1
The easiest method. Adds an email button to the end of each post.

1. Login to Blogger if not already logged in

2. Navigate to Layout > Page Elements

3. Within the template click the Edit link on Blog Posts


4. A pop up menu will open. Under Select Items check the box labelled Show Email Post Links

5. Click Save

6. Click on View Blog and scroll to the end of your post to see the envelope button which has now appeared.


Add Email This Post to Blogger - Method 2

Another method of adding an email this post link to your blog is to add an all-in-one social bookmarking button to your Blogger Blogspot blog. All in one social bookmarking buttons are minimalist and reduce the clutter of having lots of buttons. Read the following article for information about how to add an Add This Social Bookmarking Button to your Blogger blog


Add Email This Post to Blogger - Method 3
By far the most advanced method and requires a change to your Blogger template. Yet another way to add an email this post link to your Blogger blog is to make use of your Feedburner FeedFlare if you have one. For information about getting a Feedburner FeedFlare for a Blogger feed and configuring it please refer to my article Add a Feedburner FeedFlare to a Blogger Feed

Assuming that you already have a burned feed at Feedburner (if not then read my article on how to Burn a Blogger RSS Feed at Feedburner and a FeedFlare set up follow these instructions to add an email this post link.

1. Click the My Account link at the top right corner of the Blogger navbar and then select Feedburner from the list of Google services or sign in to Feedburner directly.

2. Select your blog feed from the My Feeds List on the My Feeds page

3. From the Feedburner dashboard select the Optimize tab.

4. From the left sidebar menu select FeedFlare

5. On the FeedFlare page enable Email This by checking the box under the Site column. (Note the first column is what appears in the feed and the second column is what will appear on your blog). If you don't have your FeedFlare set up yet you can set up the FeedFlare options for both site and feed together at the same time. Follow my article about adding a Feedburner FeedFlare to Blogger for more on this.


6. Once you have checked the Email This option under Site and added any other options to the FeedFlare in the feed or site that you would like then click on Save. If this is a new FeedFlare then you will click on a button marked Activate instead.


7. After activating or saving you need to get the code to add to Blogger. Do this by clicking on the dropdown menu labelled Get the HTML code to put FeedFlare on your site and selecting Blogger from the list.

8. A pop up window entitled Adding FeedFlare to your Blogger blog will open with instructions on how to make the necessary changes to your blog. These are a bit confusing so I will break them down a bit here. Don't close this window yet as we will return

9. Login into Blogger if not already logged in

10. Navigate to Layout > Edit HTML.

11. Check the Expand Widgets Template

12. As a precaution back up you template

13. Scroll down to the following code or use CTRL + F to bring up the search tool.


<div class='post-footer'>


Note assumes you are using layout in Blogger. If you don't have this code you are likely to be using a custom template and will need to read the advanced instructions. Any problems just ask.

14. Copy the layout code in the Feedburner pop up window and paste it directly below this line <div class='post-footer'>

15. Click Save Template to save changes

16. Click View Blog to see the link in the footer of your blog posts


In this article I have suggested three different methods to add an Email This Post link to a Blogger Blogspot blog to give readers the option of emailing their favorite articles directly to themselves. If you get stuck or have problems with any of these methods please just ask and I will try to help.


Related Articles
Add Email Subscription Links to Your Blogger Blogspot Blog
Add a Social Bookmarking Button to your Blogger Blog
Add a Feedburner FeedFlare to a Blogger Feed
Burn a Blogger RSS Feed at Feedburner
List of How Blog Works Tutorials for Blogger Blogs
Read Full Post ...

Thursday, September 01, 2011


Choose Your Own Blogger Post Date

In this tutorial I will show you how to set a different date from the actual date when posting to your Blogger Blogspot blog and discuss some of the benefits and uses of setting a different date.

Benefits of Setting a Different Date
Blogger permits a Blogger webmaster to set any publication date for a post they choose. This flexibility means that when you publish your entry it can be published retrospectively, in the here and now or for a future date. There are a variety of reasons for setting a particular publishing date for a post:

Set a Retrospective Publication Date
Some examples of situations where you may find it useful to set a post to a retrospective date are:

In order to keep continuity with a sequence of articles. You might use this feature if you forget to post an article in a sequence or decide afterwards to add an extra article to the sequence.

Another application for the retrospective date feature is to create a page such as an About page and attribute a specific date to it. I have gone back and written an About page on several of my blogs long after I have set them up. It is possible to go back several years if you wish. I would recommend setting the date of your About page to prior to your first post so that it appears at the beginning of your feed.

Bear in mind when posting to a retrospective date that the post will still appear in your recent posts feed even though you set a date in the past. While this can be annoying at times it is not much of a problem unless you rarely post to your blog.

Set a Future Publication Date
It is very handy to set a future publication date for your blog entries. One obvious time is when you go on vacation and want to stagger the publication of posts you have already written. Blogger allows you to set up your posts to be published on a specified date and time simply by setting a future date and time.

If you write a lot of articles about a particular theme it can be very useful to publish them in a set sequence. Blogger will allow you to set a future date for each article so that they can be published in the sequence you have chosen. For instance you might have written 7 articles on a theme and wish to publish them every 2 days over two weeks. Blogger will allow you to choose a future date for each of the articles and schedule them for publication on that user defined date and time.


How to Set a User Defined Publication Date

1. Create a post for your Blogger blog as usual

2. Click on the Post Options link found at the bottom left corner of the Compose box and directly above the Publish Post button

3. Set the specified date and time you wish your post to be published on

4. Click on the Publish Post button

If you have set a retrospective date your post will be published immediately and you will be able to view it in your blog archives.


If you set a future date your post will be scheduled for publication. Click on the link to Edit Posts and view your post in the list. It should be at the top of the list. Notice that it will marked "scheduled" in red. When the exact date and time set is arrived at Blogger will publish your post automatically.


In this tutorial I have discussed reasons why you might choose to set your own user defined post date for your Blogger posts. I have also shown you how to go about setting a different post date through the Post Options feature in Blogger.
Read Full Post ...


How to Add a Subtitle to Blogger Posts

This Blogger tutorial shows you how to easily and quickly add a subtitle to your Blogger posts (Blogspot posts) so that both search engines and readers will have more information about your post. 

I also discuss the benefits of adding subtitles to Blogger articles. This is an easy tweak to your Blogger blog that anyone can carry out in a couple of minutes.


Benefits of Using Subtitles in Posts
Adding a subtitle which appears below the title of your post can be both eye catching and informative. For instance a titling schema for this post could be:


Title: Add a Subtitle to a Blogger Blog


Subtitle: Make Your Posts More Search Engine Friendly and User Friendly


If you craft your titles and subtitles carefully you will encourage more targeted readers of your blog as they will be able to see at a glance what your post is about rather than reading the whole article. Your traffic therefore might be slightly less but they will be far more targeted to the content of your site resulting in a lower bounce rate.

If the subtitle you choose for your Blogger post is keyword rich then you are also improving your chances of gaining a higher position in search engine result pages because search engines give added weight to headings and to text early on in an article. By adding a subtitle to a Blogger post you have a SEO tool which if used effectively could result in more visitors finding your site because of higher keyword density.

You can of course add a subtitle manually to each post and format it everytime. The advantage of this method over doing it manually though is that all the formatting is in the stylesheet section of your template so you only have to change the colour scheme and font variables in one location and Blogger will look after the rest. Any change will be reflected in each and every post that has the subtitle <div> tags.


How to Add a Subtitle to Blogger Posts
This tutorial guides you through the steps to take to add a subtitle to your Blogger blog. The trick requires only takes a few short minutes and requires only a small snippet of code to be added to your template. Provided the instructions are followed anyone can do this including beginners and new bloggers. Interestingly it is not widely known or written about in technical blogs that a subtitle can be added to your Blogger Blogspot blog posts yet the advantages are considerable.

1. Log in to Blogger and navigate to Design > Edit HTML

2. Find the </b:skin> tag in your template. If you are have difficulty finding it use CTRL + F to bring up the Blogger toolbar at the bottom of your blog and enter the tag </b:skin> into the search box on the toolbar

3. Copy and paste the code below into your template making sure that it appears before the </b:skin> closing tag.


.subtitle{
font-family:Trebuchet MS',Verdana,Arial,Sans-serif;
font-size:15px;
color: #ca1717;
line-height:20px;
}


This code inserts a subtitle in red. You will need to change this color to match your template. See later in this post for information on how to add styling or change the color of the subtitle. If you wish to use a known variable as shown in the above image you can. color: $dateheadercolor; could be used for example provided this variable had already been declared in the variables section of the template.


4. Save Template

5. Go to the post you wish to add a subtitle to by clicking on the Posting tab and then the Edit Posts link.

6. Copy and paste the following code into your post ahead of any other text.


<div class="subtitle">Subtitle Text. Please Substitute for your own text</div>


7. Substitute your own text between the <div> tags

8. Navigate to Settings > Formatting and under the last option Post Template enter the following into the box:


<div class="subtitle"></div>


This will mean that every time you create a post you will have the tags appear automatically. All you need do is place the text of your subtitle between the tags. If you don't want to use a subtitle for a particular post just delete the tags.

9. Save Changes to Post and click on View Blog to admire your new subtitle.


Customizing the CSS Styling of a Blogger Subtitle
It is easy to customize your subtitle for a different font type, color and size. Just change the code you added before the </b:skin> tag. If you want a specific color for instance you could change the color I have chosen for another color, increase the font size, and change the font face to Times Roman for instance. Thus your code would become something like this:


.subtitle{

font-family:Georgia, "Times New Roman", Times, serif;
font-size:16px;
color:#ff6600;
line-height:20px;


This Blogger tutorial has shown you how to add a subtitle to your Blogger posts (Blogspot posts) quickly and easily. I have discussed the benefits of inserting a subtitle feature on a Blogger blog including how this might assist search engines to correctly index your blog articles. I have also shown you how to customize your subtitle to your own individual requirements using CSS styling


Related Posts
List of How Blog Works Tutorials for Blogger Blogs
Read Full Post ...

Tuesday, August 30, 2011


Add Printer Button or Link to Blogger Blogspot

Today's article will show you how to add a print button or printer link to your Blogger Blogspot blog. The facility to print a hard copy of a post may be important to some visitors especially if you are like me and publish lengthy posts. Adding a printer button or link will add to your blog's functionality and user friendliness.

The reason I am writing this article is in response to a reader who asked me how to print out posts without the sidebar showing up. All the suggested buttons and links print out the post only and not the sidebar, header or footer.

This tutorial involves changing the template code but is not difficult as long as you follow these step by step instructions.

How to Add a Custom Print Button to Your Blogger Blogspot Blog
The following instructions will place a printer button on each individual page of your blog below the post. Only the blog article itself will be printed along with any comments. The sidebar will not be printed.

Example of the printer button to be added:
1. Log in to Blogger if not already logged in

2. Navigate to Layout > Edit HTML

3. Back up your template by downloading full template to your computer

4. Check Expand Widgets Template

5. Bring up the search toolbar by using CTRL + F

6. Find this line by typing it into the search box:


<p><data:post.body/></p>


7. Now replace that line with the following code block:


<!-- Add Printer Button by http://howblogworks.blogspot.com/-->
<span class='noprint'><p><data:post.body/></p></span>
<b:if cond='data:blog.pageType == &quot;item&quot;'>
<a href='javascript:window.print()'>
<img src='http://i1020.photobucket.com/albums/af326/bookwise77/printer-button.gif'/></a></b:if>
<!-- End Add Printer Button by http://
howblogworks.blogspot.com/-->


8. Click on Save Template to save changes

9. Click View Blog to see your button in action

Note: If you want to change the printer icon to your own icon upload your image to a photo storage service like Photobucket and note the URL address of the icon. Now substitute the URL address of the existing image for your image by changing the line beginning with <img src='
Change printer icon to this alternative printer icon
So to change the printer image to another printer image the code would look like:


<!-- Add Printer Button by http://
howblogworks.blogspot.com/-->
<span class='noprint'><p><data:post.body/></p></span>
<b:if cond='data:blog.pageType == &quot;item&quot;'>
<a href='javascript:window.print()'><img src='http://i1020.photobucket.com/albums/af326/bookwise77/printer-button-2.gif'/></a></b:if>
<!-- End Add Printer Button by http://
howblogworks.blogspot.com/-->


How to Add a Printer Link to a Blogger Blogspot Blog
You may not want a button and prefer to add a printer link instead. To do this you would follow steps 1 to 6 and then insert the following code instead of the code contained in step 7


<!-- Add Printer Link by http://
howblogworks.blogspot.com/-->
<p><span class='noprint'><data:post.body/></p></span>
<b:if cond='data:blog.pageType == &quot;item&quot;'>
<a href='javascript:window.print()'>Print this post</a>
</b:if>
<!-- End Add Printer Link by http://
howblogworks.blogspot.com/-->


Save the changes to your template and then navigate to an individual post to see your link at the bottom of the post.


How To Add a Combination of Printer Button and Link
If you would like to display a printer button along with a link follow steps 1 to 6 and then insert the following code instead of the code contained in step 7


<!-- Add Combined Printer Button and link by http://
howblogworks.blogspot.com/-->
<span class='noprint'><p><data:post.body/></p></span>
<b:if cond='data:blog.pageType == &quot;item&quot;'>
<span style='background: url(http://i1020.photobucket.com/albums/af326/bookwise77/printer-button.gif) left no-repeat; padding-left: 28px;'>
<a href='javascript:window.print()'>Print this post</a></span>
</b:if>
<!-- End Add Combined Printer Button and link by http://
howblogworks.blogspot.com/-->


In this article I have shown you how to add a print button, a print link and a combined button and link to the bottom of your Blogger Blogspot posts. Enjoy!


Related Articles
List of How Blog Works Tutorials for Blogger Blogs
Read Full Post ...


Add Outbrain Ratings Widget to Blogger

Outbrain provides a free and very stylish content recommendations and ratings widget which can be easily added to your Blogger Blogspot blog. In this tutorial I will discuss the benefits of Outbrain and also provide a step by step walkthrough of the process of adding an Outbrain widget to your Blogger blog and your Feedburner FeedFlare if you have burned your blog feed at Feedburner.


Benefits of Adding Outbrain to Your Blogger Blog
By adding an Outbrain content and ratings widget to your Blogger blog you will encourage visitors to record their reactions to a post they have just read. Along with features likes polls this is another good method of encouraging visitors to interact with your blog. Outbrain also makes it possible to display your most popular posts within the widget. In addition the Outbrain ratings widget may help drive more traffic to your blog when your visitors use the Recommended Posts feature which is embedded in the widget. By the same token it may also mean that the traffic doesn't stay long as visitors will be wooed away by recommended links so you will have to weigh up the benefits versus the costs for yourself. Outbrain also provides reports on widget activity

How to Add an Outbrain Ratings Widget to Blogger
1. Register at Outbrain. This is a simple sign up process that requires you to click on a confirmation email once you have requested sign up and filled out a simple form.

2. Once registered click on Get the Widget from the footer menu

3. Choose Blogger as your Blogging platform

4. Select the language of your widget if other than English which is the default

5. Click on Get the Widget button and Outbrain will automatically refer you to Blogger in a new window. Sign in to Blogger in the new browser window. Don't close the Outbrain window as we will be returning here.

6. Choose your blog from the drop down menu and click on the Add Widget button.

7. Navigate to Layout > Page Elements and reposition if necessary your new widget which will now be appearing in the sidebar of your blog. Save any changes you make.

8. Return to Outbrain in your open browser window and click on the click here link to verify your blog. You will receive a message verifying that you have claimed your blog

9. Click on the View Blog link in the menu tab section and view your new Outbrain widget in action.

Note that once your readers start to rate your posts by clicking on them the stars will become yellow. 5 yellow stars is an excellent rating


Customizing Your Outbrain Ratings Widget
1. Return to the Outbrain window in your browser

2. Navigate to Manage Posts using the Sidebar Menu on the lefthand side

3. In the list of blogs you will see your blog listed. Click on the settings link

4. If you leave the default setting you will see recommended links appearing as pictured above in #9. If you don't want any recommendations you can set this to no.

5. If you have set up your blog with the idea of earning a little extra money you may choose to turn off sponsored recommendations. If you leave the radio button set to yes any proceeds from the sponsored links clicked on will go to charity. The charity sponsored can be selected via the drop down menu

6. Outbrain will show the most popular posts in the sidebar of your blog if this feature is enabled. To enable popular posts select the enable radio button.

7. Click on the Submit button


Adding Outbrain to Your Feedburner FeedFlare
If you already have a FeedFlare appearing at the footer of your burned Feedburner feed of your blog you can easily add Outbrain too. Check out my article on adding a Feedburner FeedFlare to Blogger if you are not sure what a FeedFlare is or how to add one to Blogger.

Go to Feedburner and choose your blog from the list of My Feeds. Select the Optimize tab and then FeedFlare from the lefthand sidebar menu. In the Personal FeedFlare section paste the following code (URL) into the text box:

http://widgets.outbrain.com/FeedFlareUnit.xml


and click on the Add New Flare button. Click on Save. Your readers will now be able to rate your blog straight from your Blogger feed.

Outbrain Troubleshooting Tips for Blogger Installation
  • When you install Outbrain on your blog resist the temptation to rate one of your posts as this vote can't be deleted once it is cast. Even when I tried uninstalling and reinstalling the widget the vote did not clear.
  • The Popular Posts feature takes a while to show any posts as it needs at least 2 visits before it will start rating the post
  • If you have other problems with Outbrain try this active Outbrain support forum for answers

In this tutorial you have learned how to install the Outbrain Ratings widget on your Blogger Blogspot blog and customize it. Also some of the benefits of the Outbrain widget were discussed along with a couple of Outbrain installation troubleshooting tips. If you have a moment let me know how you get on installing this widget. Don't forget to bookmark this post for easy reference.

Related Articles
Add a Feedburner FeedFlare to Blogger Feed
Read Full Post ...


Hide Remove Navbar from a Blogger Blog

The more professional you want your site to look the more you are likely to want to remove the navbar from showing above the header of your Blogger Blogspot blog. Removing or actually hiding the navbar is very easy to do as it only requires a small tweak to your template. This tutorial is suitable for bloggers at all levels but is written with new bloggers and the beginner blogger in mind and provides step by step instructions to guide you through the process of hiding the navbar from your Blogger blog.

How Useful is the Navbar of a Blogger Blog?
Blogger provides the facility to search your blog by entering keywords or a search phrase into the Search Blog box. This is a useful feature and if you remove the Blogger navbar you will lose the search facility from your blog. If you are using a custom template with a search box already built in this won't be a problem but if you are using one of the Blogger templates deleting the navbar will leave your blog without a search function. Another useful feature of the navbar is the follow button which encourages bloggers to start following your blog.

The random blog feature is not particularly useful unless you have a lot of time on your hands and just feel like a browse. For most serious bloggers looking to create a professional look and feel to their blog the navbar can be a distraction. And let's face it you've worked hard enough getting the traffic to your site right? without encouraging them to leave it too quickly.


The other main feature of the navbar is the ability to navigate back to your layout menu or posts quickly no matter where you are in your blog when signed in. Personally I like this feature and use it a lot. Its particularly good if you are on a page other than your homepage and want to quickly go to another of your blogs as you can get there in 2 clicks. The same goes if you want to visit some other area of your Google account such as Google Analytics or Google Webmaster Tools. You can get there in 2 clicks too when the navbar is enabled.


Blogger have now created another reason to think twice before you remove the Blogger Navbar as they have recently added a Share button so that readers can quickly add your blog to their Twitter, Facebook and Google Reader accounts. The facility to Email your posts is also available when using the Blogger Share button from an individual post page.


To navigate with the navbar disabled you simply have to double click the back button in your browser to navigate away from the home page of your blog. If you are in another part of your blog then it can be annoying not to have the navbar functionality. The way I have gotten around it is to usually disable the navbar and click on blogger.com in the google search box on the toolbar of my browser. Provided I am signed in to Blogger this will take me straight to the dashboard.

Overall my view is that what you lose on convenience you gain on professionalism. Losing the navbar is a sacrifice but it is a small price to pay for a much improved look to your blog.


How to Get Rid of the Navbar on your Blogger Blog

1. Login to Blogger and navigate to Layout > Edit HTML> Expand Widget Templates.

2. Find the Template Credit Section

/* Variable definitions
  ====================


3. Insert the following code directly above this code(/* Variable definitions). Select the code and right click to copy to the clipboard of your computer. Right click to paste into your template:


#navbar-iframe {
   display: none !important;
}


or this code, which ever would you like, both code works fine...


#navbar { 
height: 0px;
visibility: hidden;
display: none;
}


4. Click on the Save Template button

5. Click on View Blog to view you blog without the navbar


Troubleshooting
If you later decide that you are not happy with the missing navbar all you need do to reinstate it is to remove the code you inserted. This works as the code you inserted actually only masks the navbar rather than deletes it.

In this tutorial you have learned about some of the advantages and disadvantages of the Blogger navbar and how to hide, disable, remove or delete the navbar in order to promote a more professional looking blog.

Related Articles
List of How Blog Works Blogger Tutorials
Read Full Post ...


Add a Horizontal Links Menu to Blogger

In this Blogger tutorial you will learn how to place a horizontal row of menu items above your first post in your Blogger blog (Blogspot blog). This process requires adding both a small amount of code to your Blogger template and a HTML/Javascript widget to your layout. This tutorial is suitable for Blogger (Blogspot) webmasters of all abilities.

Navigating a website using a horizontal menu is a traditional way to get around. On this blog for example you can see that I have tweaked Blogger to create a row of horizontal text links for easier navigation of popular pages and labels. Follow the step by step instructions below and you will be able to add a customized menu of horizontal links to your Blogspot blog as seen here.


If you are using a default template you can add a menu by using the Blogger pages feature. This tutorial shows you how to manually add a top menu and add links to it.


Steps to Add a Horizontal Links Menu Above Blog Posts

1. In Blogger navigate to Design > Edit HTML

2. Locate the header style sheet section which will usually be notated as

/* Blog Header */


If you can't find this line then locate the following area of your stylesheet using CTRL + F and place before these lines


]]></b:skin>
</head>


3. Copy and paste the following CSS code into your template under the header section taking care not to overwrite any existing code and to include the end bracket. It is probably best to paste into the bottom of the header style sheet section so that it is easier to change the code if necessary.


/* Blog Header */

#newnavbar ul li{
font-size:100%;
list-style-type: none;
display:inline;
padding:0px;
margin:10px;
border:0px solid;
}

#newnavbar li a{
color:#335577;
}

#newnavbar li a:visited {
color: #990066;
}

#newnavbar li a:hover {
color: #99FFFF;
background: #CCFFFF;
}


4. Click on Save Template

Note: You will need to change the colors to suit the color scheme of your blog. Change every instance of color and the background color to customize to your own requirements

5. Navigate to Design > Page Elements

6. Click on Add a Gadget in the Blog Posts area. If you don't have this option already set on your template you can enable it by locating the following code and setting showaddelement to yes.


<div id='main-wrapper'>
<b:section class="'main'" id="'main'" showaddelement="'yes'>


7. Select HTML/Javascript from the menu

8. Copy and Paste the following code into the Content box. There is no need to add a title. You can alter the code to suit your own needs depending on the links required.


<div id='newnavbar'>
<ul>
<a href="Home Page URL">Home</a></li>
<li><a href="URL of Your Blogger Profile Page">About Me</a></li>
<li><a href="URL of Any Label You Choose">Label of Your Choice</a></li>
</ul></div>


To add a link to a label, as I did on this site, in this case Blogger Tutorials, you would enter the following:

<a href="http://howblogworks.blogspot.com/search/label/Blogger%20Tutorials">Blogger Tutorials</a>


9. Your script should be above your posts and any advertising or banners. If it is not drag it to the top position


10. Click on Save

11. Click on View Blog to see your new menu in action


Steps to Add a Horizontal Link Menu to Header

If you prefer you can add your horizontal link menu to your header instead of directly above your first post. In this case follow the steps below:

1. Follow steps 1 to 4 as for menu above first post

2. Navigate to Design > Edit HTML

3. No need to check Expand Widget Templates

4. Locate the beginning of the body section which will be tagged as <body>

5. Find the line: <b:section class='header' id='header' maxwidgets='1'>

6. Change maxwidgets from 1 to 3.


7. Click on Save Template

8. Navigate to Design > Page Elements

9. Click on Add a Gadget in the Header area.

10.Select HTML/Javascript from the menu

11.Copy and Paste the following code into the Content box. There is no need to add a title. You can alter the code to suit your own needs depending on the links required.


<div id='newnavbar'>
<ul>
<a href="Home Page URL">Home</a></li>
<li><a href="URL of Your Blogger Profile Page">About Me</a></li>
<li><a href="URL of Any Label You Choose">Label of Your Choice</a></li>
</ul></div>


To add a link to a label, as I did on this site, in this case Blogger Tutorials, you would enter the following:


<a href="http://howblogworks.blogspot.com/search/label/Blogger%20Tutorials">Blogger Tutorials</a>


12. Click on Save Template

13. Click on View Blog to view the new horizontal menu in your header

Tips and Troubleshooting
To add this horizontal navigation menu to the area below the header do the following:

  1. Login in to Blogger
  2. Navigate to Design > Edit HTML
  3. Find the following lines of code:


    <div id='crosscol-wrapper' style='text-align:center'>
    <b:section class='crosscol' id='crosscol' showaddelement='no'/>
    </div>

  4. Change showaddelement to yes


    <div id='crosscol-wrapper' style='text-align:center'>
    <b:section class='crosscol' id='crosscol' showaddelement='yes'/>
    </div>

  5. To left align the menu change text-align:center to text-align:left
  6. Paste the code in step 3 of Steps to Add a Horizontal Link Menu Above First Post directly before the following:


    ]]></b:skin>
    </head>

  7. Save Template
  8. Navigate to Design > Page Elements
  9. Click on Add a Gadget in the new area enabled below header
  10. Select HTML/Javascript from the menu
  11. Copy and paste the code in step 8 of Steps to Add a Horizontal Link Menu Above First Post into the content area of the gadget and change links to your own requirements
  12. Save gadget and select View Blog to see your menu in action

This Blogger tutorial has shown you how to add a horizontal links navigation menu to a Blogger blog (Blogspot blog) either in the header itself, directly above the very first post or in the area between the header and first post. In adding a navigation menu to your blog you improve the user friendliness of your blog by helping your visitors find information and posts more readily. Any questions please don't hesitate to ask.

Related Posts
List of How Blog Works Tutorials for Blogger Blogs
Read Full Post ...


Add a Welcome Message to Blogger Blog

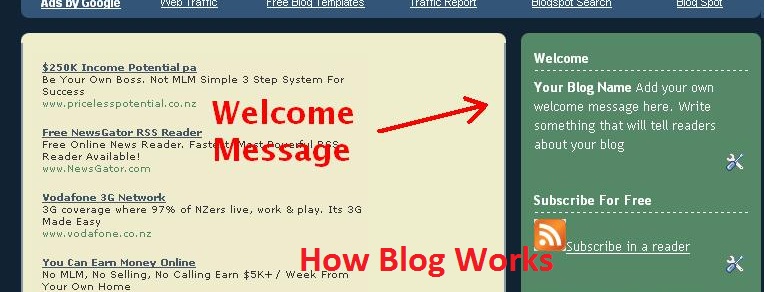
Would you like to welcome visitors to your Blogger Blogspot blog with a simple welcome message? In this tutorial I will show you how to add a short welcome message to your Blogger sidebar using the text gadget. This tutorial is aimed at beginner bloggers and those new to Blogger.

How to Add a Welcome Message to the Blogger Sidebar

1. Login to Blogger if you are not already signed in

2. From the Dashboard select the link to your blog. If you have more than one blog you will need to choose from a list of your blogs displayed on the dashboard

3. Navigate to the Layout > Page Elements page by clicking on the Layout tab and then the Page Elements link.

4. Click on Add a Gadget in the sidebar of your blog

5. Choose the Text gadget from the list.

6. Paste the following into the content box of the gadget:


To Your Blog Name. Add your own welcome message here. Write something that will tell readers about your blog


7. Bold Your Blog Name by highlighting the Your Blog Name text and selecting b from the formatting options

8. Type the word Welcome into the Title box

9. Click on the Save button to save the gadget

10. Click on the Save button in your template to save your changes

11. Click on View Blog and admire your new welcome message which will appear at the top of your blog's sidebar

12. Now you have an idea of what it looks like click on the back button of your browser to return you to the Page Elements screen


To Edit the Content of the Text Gadget
Select Edit by clicking on the edit link of the gadget in the sidebar and changing the contents or title and saving the changes

To Remove the Gadget
Select Edit by clicking on the edit link and choosing the remove button

In this tutorial for newbies and beginner bloggers I have outlined the steps necessary to add a text gadget to the sidebar of your Blogger Blogspot blog. By way of example I have shown you how to add a welcome message to your blog sidebar
Read Full Post ...