Showing posts with label SEO Tips and Tricks. Show all posts

Thursday, September 01, 2011


How to Add a Subtitle to Blogger Posts

This Blogger tutorial shows you how to easily and quickly add a subtitle to your Blogger posts (Blogspot posts) so that both search engines and readers will have more information about your post. 

I also discuss the benefits of adding subtitles to Blogger articles. This is an easy tweak to your Blogger blog that anyone can carry out in a couple of minutes.


Benefits of Using Subtitles in Posts
Adding a subtitle which appears below the title of your post can be both eye catching and informative. For instance a titling schema for this post could be:


Title: Add a Subtitle to a Blogger Blog


Subtitle: Make Your Posts More Search Engine Friendly and User Friendly


If you craft your titles and subtitles carefully you will encourage more targeted readers of your blog as they will be able to see at a glance what your post is about rather than reading the whole article. Your traffic therefore might be slightly less but they will be far more targeted to the content of your site resulting in a lower bounce rate.

If the subtitle you choose for your Blogger post is keyword rich then you are also improving your chances of gaining a higher position in search engine result pages because search engines give added weight to headings and to text early on in an article. By adding a subtitle to a Blogger post you have a SEO tool which if used effectively could result in more visitors finding your site because of higher keyword density.

You can of course add a subtitle manually to each post and format it everytime. The advantage of this method over doing it manually though is that all the formatting is in the stylesheet section of your template so you only have to change the colour scheme and font variables in one location and Blogger will look after the rest. Any change will be reflected in each and every post that has the subtitle <div> tags.


How to Add a Subtitle to Blogger Posts
This tutorial guides you through the steps to take to add a subtitle to your Blogger blog. The trick requires only takes a few short minutes and requires only a small snippet of code to be added to your template. Provided the instructions are followed anyone can do this including beginners and new bloggers. Interestingly it is not widely known or written about in technical blogs that a subtitle can be added to your Blogger Blogspot blog posts yet the advantages are considerable.

1. Log in to Blogger and navigate to Design > Edit HTML

2. Find the </b:skin> tag in your template. If you are have difficulty finding it use CTRL + F to bring up the Blogger toolbar at the bottom of your blog and enter the tag </b:skin> into the search box on the toolbar

3. Copy and paste the code below into your template making sure that it appears before the </b:skin> closing tag.


.subtitle{
font-family:Trebuchet MS',Verdana,Arial,Sans-serif;
font-size:15px;
color: #ca1717;
line-height:20px;
}


This code inserts a subtitle in red. You will need to change this color to match your template. See later in this post for information on how to add styling or change the color of the subtitle. If you wish to use a known variable as shown in the above image you can. color: $dateheadercolor; could be used for example provided this variable had already been declared in the variables section of the template.


4. Save Template

5. Go to the post you wish to add a subtitle to by clicking on the Posting tab and then the Edit Posts link.

6. Copy and paste the following code into your post ahead of any other text.
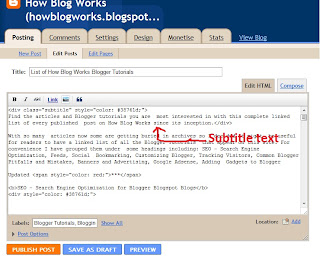

<div class="subtitle">Subtitle Text. Please Substitute for your own text</div>


7. Substitute your own text between the <div> tags

8. Navigate to Settings > Formatting and under the last option Post Template enter the following into the box:


<div class="subtitle"></div>


This will mean that every time you create a post you will have the tags appear automatically. All you need do is place the text of your subtitle between the tags. If you don't want to use a subtitle for a particular post just delete the tags.

9. Save Changes to Post and click on View Blog to admire your new subtitle.


Customizing the CSS Styling of a Blogger Subtitle
It is easy to customize your subtitle for a different font type, color and size. Just change the code you added before the </b:skin> tag. If you want a specific color for instance you could change the color I have chosen for another color, increase the font size, and change the font face to Times Roman for instance. Thus your code would become something like this:


.subtitle{

font-family:Georgia, "Times New Roman", Times, serif;
font-size:16px;
color:#ff6600;
line-height:20px;


This Blogger tutorial has shown you how to add a subtitle to your Blogger posts (Blogspot posts) quickly and easily. I have discussed the benefits of inserting a subtitle feature on a Blogger blog including how this might assist search engines to correctly index your blog articles. I have also shown you how to customize your subtitle to your own individual requirements using CSS styling


Related Posts
List of How Blog Works Tutorials for Blogger Blogs
Read Full Post ...


How to Add Internal Links Within Blogger Posts

In the Blogger tutorial I discuss how to add internal links within your Blogger posts (Blogspot posts) to point to either another section within the same post or to another post.

There are lots of times when you may want to direct a reader to a different part of your Blogger post depending on what their needs and interests are. Or you might want to alert the visitor to something significant in a related post. In this article I will show how to make use of internal links both within posts and in Blogger generally.

Why bother with internal linking you may be wondering? Well the answer is to improve SEO. Blogs with a good internal linking structure will fare better than blogs that don't link posts. Plus you will be creating an aid to navigation for your reader. On longer posts jumps links to different sections within your post or to other posts mean readers can quickly find the information they are looking for.

How to Create Internal Links To Sections Within the Same Blogger Posts

How to Create Internal Links To Sections Within Different Blogger Posts

How to Create Internal Links To Sections Within the Same Blogger Post
Consider the above links. Click on them. Each jump the reader to a different part of this article. This type of internal linking is common practice in website building and can be equally applied to blogs to assist with navigation.

How did I create these links? The answer is that I used simple html that anyone can learn in a few minutes. Here are the steps I used to create these links.

  1. Log in to Blogger
  2. Go to Posting > New Post or Edit Post and either create a new article or edit an existing one.
  3. Within the article find a place where you want to add some jump links. This will be early on in the article as it will help the reader figure out what information is significant to them and how to get there quickly
  4. Switch to the Edit HTML mode rather than compose mode so you can see the code you are inserting into your post
  5. Create a couple of headings that will be your links to material further down in your Blogger article. Note you can also just jump to a word but for the purposes of this demonstration and clarity I am going to use headings. When creating this post I used the following headings:


    How to Create Internal Links To Sections Within the Same Blogger Post
    How to Create Internal Links To Sections Within Different Blogger Posts

  6. Add links to your headings like so:


    <a href="#withinposts">How to Create Internal Links To Sections Within the Same Blogger Post</a>

    <a href="#withinblogger">How to Create Internal Links To Sections Within Different Blogger Posts</a>


    • The href attribute and closing </a> element is the same structure you use for other links in your blog
    • Each identifier is preceded by a hash mark (#). The # tells the visitor's browser to look for a section within your post
    • Each link identifier needs its own unique identifier and needs to be enclosed in inverted commas. Use a name that reflects the link you are creating if possible as it will make it easier to identify on a page with a lot of internal jump links.
  7. Now go to the first point in your post where you want to jump the reader to. This will be the start of some new idea, section or logical split in the information.
  8. At this point create your anchor text by first adding your heading and then enclosing your heading with this anchor structure.


    <a name="identifier">a heading</a>


    • Note the use of the name attribute at the beginning and the </a> element at the end
    • Each link identifier needs to be enclosed in inverted commas. Make sure to match up the correct identifier with the one created in step 6


    Using this anchoring structure our first anchor becomes:


    <a name="withinposts">How to Create Internal Links To Sections Within the Same Blogger Post</a>


    Substitute your own link identifier and headings
  9. Now move on to the next point you want to link to and create the second anchor. In this example we use the same structure but change the identifier


    <a name="withinblogger">How to Create Internal Links To Sections Within Different Blogger Posts</a>


    Again substitute your own link identifier and headings to suit your article
  10. Save and Publish as normal and you will see your links are live and will jump the reader to different parts of the post


How to Create Internal Links To Sections Within Different Blogger Posts
Now you know how to create links to sections within Blogger posts let's look at how to create internal links within different Blogger posts.

Most of you will be able to create a link to another post in Blogger using the posts editor. You just highlight the text you want and click on the figure eight icon and Blogger creates the link for you. Which is great most of the time.

However what if we want to direct the visitor to a particular section of a different post? When you create an internal link it will take the viewer to the top of the page but what if you want them to see something near the end of the article? Well using an internal link similar to what we did to create internal links within the post we can.

Say I want to take my reader to a particular post in this case Blogger SEO Tips and Tricks. How would I go about it?

  1. I create the link as usual by copying the article URL address from the browser address bar and using the post editor to add the link. The Blogger post editor uses this structure:


    <a href="URLaddress">linkname</a>


    So the Blogger editor would create the following link:


    <a href="http://howblogworks.blogspot.com/2011/08/blogger-blogspot-seo-tips-and-tricks.html">Blogger SEO Tips and Tricks</a>


    The link would appear like this in a browser:

    Blogger SEO Tips and Tricks
  2. Now I want to direct my visitors to the section about creating breadcrumb navigation so I add a section name using the following structure:


    <a href="URLaddress#identifier">linkname</a>


    Thus my link would look like this in the Edit HTML section of my post editor


    <a href="http://howblogworks.blogspot.com/2011/08/blogger-blogspot-seo-tips-and-tricks.html#breadcrumb">Blogger SEO Tips and Tricks</a>


    Note the link seen in a browser remains the same
  3. If you want your link to open in a new browser window add the following to your link:


    <a href="http://howblogworks.blogspot.com/2011/08/blogger-blogspot-seo-tips-and-tricks.html#breadcrumb" target="_blank">Blogger SEO Tips and Tricks</a>

  4. Now I need to go to the post I am linking to and add the anchor. So in the post SEO Tips and Tricks I would use the following structure to link to the section about how to add breadcrumbs:


    <a name="identifier">a heading</a>


    So the section about breadcrumbs in the Blogger SEO Tips and Tricks article is now enclosed by the following:


    <a name="breadcrumb">Add Breadcrumb Navigation to your Blogger Blog</a>


    If you now click on the link below you will see that your browser open a new window and take you directly to the section about adding a breadcrumb to your blog.

    Blogger SEO Tips and Tricks
  5. Save your changes and publish your article as normal

In this Blogger tutorial you have learned how to add internal links to a particular section of a post from both within the same Blogger post and within a different post. By adding internal links you will help your visitors to find their away your blog more easily and access information quickly. You will also be adding to your blog's SEO by linking related posts.


Related Articles
List of How Blog Works Tutorials for Blogger Blogs
Blogger SEO Tips and Tricks
Read Full Post ...

Friday, August 26, 2011


Submit Your Blogspot Blog Sitemap to Google

I often see questions from beginner bloggers in forums about adding a sitemap of their Blogspot blog to Google. This is surprisingly easy to do although there is virtually no documentation about how to go about it. That's why I have written this tutorial with the beginner blogger in mind. It provides a set of simple step by step instructions to guide you through the process of adding a sitemap to Google. By following this tutorial you will have your Blogspot sitemap added to Google in less than 5 minutes flat.

Why Add a Sitemap to Google?
As Google owns the Blogger.com platform most sites are indexed by Google automatically. However, you might find as I have done that this process doesn't always run as smoothly or as quickly as you might like. Manually adding a sitemap to Google has some distinct advantages:


More likely to have timely indexing of your blog
More likely that all URLs on your site will be accessed
More frequent updating of your blog index in response to new posts
Increase in site traffic as a result of all your pages being indexed


Step by Step Guide to Adding Sitemap to Google
Follow this step by step walkthrough of how to add a sitemap to Google to your Blogspot Blog and begin enjoying the benefits.

1. Sign in to Google Webmaster Tools
Once set up this site will give you detailed analysis about how Google indexes your blog. Best way to get to Google Webmaster tools is to click on My Account on the Blogger Navbar and then choose Google Webmaster Tools from the list.

2. Navigate to the Webmaster Tools Dashboard
Directly below the word "Dashboard" in the top lefthand corner you will see the option to add a site. Click once inside the box to remove the default text. Now enter the full URL of your site in the box including the prefix http:// and click on the "Add Site" button. For example to add this site "howblogworks" you would enter http://howblogworks.blogspot.com/

3. Navigate to Webmaster Tools Overview
If all is going well you will now see your site in a list below the "Add Site" box. Click on your site in the list and you will be taken to "Dashboard>>Overview." It is easy to check you are in the right place as your site name will be listed in blue below the word "Overview".

In the overview menu you will find details about Google's current indexing of your site. If Google hasn't indexed your site yet you will see the message "No pages from your site are currently included in Google's index" displayed. Alternatively if Google has already discovered your site then you will get the following message "Googlebot has successfully accessed your home page" and "Pages from your site are included in Google's index."

4. Select Method of Verifying Your Site
Whether the pages of your site have been indexed or not you will be asked to click on the "Verify Your Site" link in the yellow box. At this point you will be given 2 options: one to verify your site by uploading an HTML file and the other by inserting a meta tag into the HTML coding on your site. As you do not have access to the server on Blogspot you will need to choose the second option. To do this select "add a meta tag" in the dropdown menu entitled "Choose Verification Method."

Immediately you make your choice you will be presented with a couple of lines of text which you will need to copy to the clipboard of your computer.

5. Go to Blogger Layout Tab of Your Site in a New Window
In another window open Blogger and sign in if you are not already signed in. From the Dashboard navigate to the "Layout" menu of your blog by clicking on the Layout tab. If you have created more than one blog make sure that you click on the appropriate title of your blog.

6. Edit the Template of Your Blog in Blogger
In the Layout menu follow the “Edit HTML” link (third from left under the Layout tab). At this point you need to search through the coding in the template for the first "Head" tag. This will be somewhere between line 7 and 10 from the top. Once you have located the correct spot paste the code for the metatag you created in Step 4 directly into the template taking care not to overwrite any existing code. Click on the "Save Template" button to update your blog.

If you wish to err on the side of caution you might consider backing up your template before you make any changes to it however as long as you are careful this precaution is probably not necessary.


8. Return to Webmaster Tools and Verify Site
Once you have saved the changes to your template return to Webmaster Tools and click on the "Verify" button at the bottom of the page in the "Dashboard>>Verify a Site" screen. You will then receive coonfirmation from Google that your site has been verified.

9. Navigate to Sitemaps in Webmaster Tools
Once your site is verified you can now move on to adding your sitemap. To do this navigate to Sitemaps by following the "Sitemaps" link in the sidemenu. This will take you to "Dashboard >> Sitemaps" where you will see a box with the URL of your site already added. Next to the box will be a button labelled "Submit Sitemap."

10. Add Sitemap in Webmaster Tools
As your blog was created in Blogspot we are going to make use of the rss or atom feed. Either can be used for this purpose.

On the Sitemaps page in Webmaster Tools type either atom.xml or rss.xml into the box provided to extend the displayed URL and click on the "Submit Sitemap" button. Using the same example as before http://howblogworks.blogspot.com/ becomes either

http://howblogworks.blogspot.com/atom.xml
or
http://howblogworks.blogspot.com/rss.xml

All going well Google will then display a message indicating that your sitemap submission is pending. It can take some hours for your sitemap to be fully updated by Google. At that point you will be able to see the number of URLs identified by Google and the time of the last download. This is useful information as it will help you keep tabs on your for your Blogger.com blog site and identify any URLs that may be being missed. Now that you have your sitemap in place you can look forward to increased traffic as more visitors will now be able to find your site.


Read This If Your Feed is Being Redirected
If you are redirecting your feed because you are using Feedburner for example you will need to add a query parameter to stop the redirect so that it will act as a sitemap.

Therefore instead of adding atom.xml you will need to add atom.xml?redirect=false to the site URL in the "Submit Sitemap" box. Thus http://howblogworks.blogspot.com/atom.xml becomes http://howblogworks.blogspot.com/atom.xml?redirect=false

If you have a lot of posts it would be worth your while adding the following parameter to have all your posts included:
atom.xml?redirect=false&start-index=1&max-results=100

In the above example Google will index your first 100 posts. If you have more than 100 posts you can create another sitemap in which case you would start your index at 101 instead of 1.

This tutorial has guided you through the process of authenticating your Blogger blog at Google Webmaster and adding a sitemap to ensure better crawling and indexing of your website.

Related Posts
List of How Blog Works Tutorials for Blogger Blogs
Read Full Post ...


Submit Your Blogspot Sitemap to Yahoo

Yahoo Site Explorer Add My Site page
One of the most important ways to attract traffic to your site is to ensure that your Blogger (Blogspot) blog is properly indexed by popular search engines such as Yahoo. If you want to increase your chances of having your site quickly indexed by the Yahoo search engine it pays to submit your site and your feed. In this tutorial we will be covering the process of signing up with Yahoo, authenticating your site and adding your site feed to Yahoo Site Explorer.

Yahoo can be notoriously slow at indexing and will not necessarily include all crawled pages in its search results. For guaranteed inclusion you can opt for a paid service but if you follow the steps below you have a good chance of having your Blogger blog properly indexed relatively quickly and without any cost.

1. Sign up for a free Yahoo Account if you don't already have one.

2. Sign in to Yahoo Site Explorer where you will be taken to the MySites page.

3. Submit your Blogger website by entering the URL of your blog and then clicking on the Add My Site button.


4. You will now see your website address included in the site list. The 3 columns to the right contain information about feeds, actions, and status. You will notice that the status of your site will be set to new (represented by a yellow circle). Click on the link to your site or click the Explore button.

5. You will be taken to the results page and should get a message like the one pictured below.


6. From the menu on the left click on the Authentication

7. You will be presented with 2 authentication options. Choose Add a META Tag from the dropdown menu then copy the code provided using Ctrl + C.

8. In a new window of your browser login to your Blogger blog. Keep the window of Site Explorer open as we will be returning.

9. Navigate to Layout > Edit HTML in your Blogger (Blogspot) blog

10. When you arrive at the Template page it is a good idea to make a backup of your site's template as a precaution. Go ahead and download it your computer by clicking on the Download Template link. Remember if you inadvertently overwrite some code you may not be able to restore your template so it is worth taking an extra few moments to do this step.

11. Once you have backed up your site locate the Head tag. It will be only a few lines of code down from the top. Now insert the copied code from Yahoo in the position suggested as shown in the picture below using the Ctrl + V command.

Blogger Template Head Tag
12. Once you have pasted the code into the template there is still one further action needed. You will need to add a trailing slash at the end of the new line of code to avoid getting a parse error. Once you have added the trailing slash and are certain you have placed the code in the correct position go ahead and click on the Save Template button.


13. Return to Yahoo Site Explorer and follow the mysite link. You will see that the status of your site has been verified and is represented by a green checkmark.

14. From the lefthand menu select Feeds. You will be taken to the feeds page where you can go ahead and add a feed for your blog by entering the URL of the feed. Notice in the example below I have set an extra parameter to handle redirection of the feed by services such as Feedburner.


15. Once the feed has been accepted it takes around 24 hours before it is active. After this time and provided there are no errors Yahoo displays "processed" followed by a green tick as can be seen in the picture below.


You have now completed the steps involved in having your Blogger (Blogspot) blog crawled and indexed by Yahoo. All that is left to do is to check back periodically to see if Yahoo has indexed your pages. This process can take time so don't expect overnight results. However once Yahoo recognises your feed your pages will be regularly crawled and any updates in content indexed. The process of adding a feed and verifying your site will have gone a long way towards ensuring your site is included in Yahoo search engine results.


Tips for Adding Blogger Blog to Yahoo Site Explorer
Tips for Submitting Your Blogger Blog to Yahoo
Yahoo Search Engine Optimisation for Blogspot Bloggers
SEO For Blogger Blogs with Yahoo
Faster indexing of your Blogger Blog by Yahoo
How to Ensure Your Blogger Blog is Indexed by Yahoo
Speed Up Indexing of Your Blogger Blog by Yahoo
Yahoo Search Engine and Blogger Blogs


In this tutorial you have learned how to submit your Blogger (Blogspot) blog to Yahoo Site Explorer by authenicating your site and adding a feed which Yahoo can use as a sitemap to improve its indexing of your pages.

Related Posts
Submit a Blogger Sitemap to Major Search Engines
10 Tips for Blogspot Bloggers for Building Site Traffic
List of How Blog Works Tutorials for Blogger Blogs
Read Full Post ...


Add a Blogger Sitemap to MSN Bing Webmaster Tools

How to add a Blogger Blog and Blogger Sitemap (Blogspot Sitemap) to Bing Webmaster Tools formerly MSN Live Search. Step by step instructions for Blogspot bloggers who want to improve search engine optimization of their blog.
Although Bing (formerly MSN Live Search) gets a fraction of search engine traffic compared to Google and Yahoo it is still worthwhile submitting your Blogger sitemap (Blogspot sitemap) and blog to Bing. The advantages of adding your blog to Bing is that you will learn more about how your site is crawled and what keywords visitors use to access your blog pages.

+++++++ INSTRUCTIONS +++++++

How to Add a Blogger Blog (Blogspot Blog)to Bing Webmaster Tools

  1. Create an account or sign into Bing at MSN. If you have a hotmail account you will already have access to Bing Webmaster Tools
  2. Navigate to the Bing Webmasters Tools page
  3. Installing Skylight is purely optional. Silverlight is Microsoft's competitive product for Adobe Flash. Try it if you wish as it adds some extra functionality but for the purposes of this Blogger tutorial it is not necessary.
  4. From the Bing Webmaster home page click on Add Site
  5. Fill in the URL address of your Blogger blog eg howblogworks.blogspot.com


  6. Click on Submit
  7. Your blog will now appear on the list of added sites under your Bing Webmaster account


  8. Click the Verify Site link at the right of your blog

  9. Choose Option 2 - Add meta tag to your default webpage


  10. Copy the meta tag code that appears in the dialog box by right clicking on it with your mouse and selecting copy. Keep the Bing Webmaster Tools window open as we will be returning


  11. Login to your Blogger account if not already logged in using a different browser window
  12. From the Dashboard go to Design > Edit HTML
  13. Paste the code below the <head> tag and before <b:skin> and as early as possible

    For the new generation of default Blogger templates I suggest placing the code just below these two lines:


    <head>
    <meta content='IE=EmulateIE7' http-equiv='X-UA-Compatible'/>


    For earlier generations of default Blog templates and custom templates I suggest you place the Bing Webmaster meta tag after these lines:

    <head>
    <b:include data='blog' name='all-head-content'/>

  14. Click on Save Template
  15. Return to Bing Webmaster and click on the Verify button
  16. If successful your Blogger blog will be added to the list of sites. Information about your blog will show not available as it takes at least 48 hours to activate.


  17. Click on your blog and you will be taken to the site information screen. Notice the menu (bank of tabs) for easy navigation (as pictured). Use the dropdown menu to navigate between your blogs if you add more than one to Bing Webmaster.


How to Add a Blogger Sitemap (Blogspot Sitemap) to Bing Webmaster
  1. Sign in to Bing Webmaster if not already signed in
  2. Click on your Blogger blog from the list of sites
  3. Click on the Crawl tab from the top menu
  4. Click on Sitemaps from the menu on the left hand side


  5. An Add Sitemap dialog box will pop up. Enter the following URL of the default posts feed of your Blogger blog eg


    http://yourblogname.blogspot.com/feeds/posts/default


    Replace the yourblogname with the name of your blog

  6. Click on the Submit button
  7. If you have entered the details of your sitemap correctly you will now be presented with a added sitemap success screen


In this Blogger tutorial I have taken you through the steps involved in submitting a Blogger blog (Blogspot blog) to Bing Webmaster Tools (MSN). I have also shown you how to add a Blogger sitemap to Bing Webmaster Tools by using the default Blogger posts feed.


In this tutorial we have discussed in detail how to submit your Blogger Blogspot blog to MSN Live Search, authenticate your site and add a sitemap.

Related Posts
Submit a Blogger Sitemap to Major Search Engines
10 Tips for Blogspot Bloggers for Building Site Traffic
List of How Blog Works Tutorials for Blogger Blog
Read Full Post ...


Submit a Blogger Sitemap to Major Search Engines

If you haven't submitted your Blogger website and sitemap to the major search engines yet this article will help you through the process. Submitting your Blogger (Blogspot) blog to the two most popular search engines Google and Yahoo is a must if you want your site crawled and indexed quickly and, of course, to receive visitors. You may also want to cast your net a little wider. If so there are a couple of other search engines worthy of note that you may not have even considered. This article explores the steps involved in submitting your blog and sitemap to 5 major search engines: Google, Yahoo, MSN Live Search, Moreover.com and Ask.com


Submit Your Site and Sitemap to Google
For a step by step walkthrough of how to submit your Blogger blog to Google, verify your site and add a sitemap please refer to my article Submit Your Blogspot Blog Sitemap to Google


Submit Your Site and Sitemap to Yahoo
Yahoo has a fair share of the search engine market and therefore getting your Blogger blog crawled and indexed needs to be a priority. For an in depth discussion on how to submit your site, verify it and submit a sitemap to Yahoo Site Explorer please see my article Submit Blogspot Sitemap to Yahoo

Yahoo Site Explorer

Submit Your Site and Sitemap to MSN
You can now submit a sitemap directly to MSN at Webmaster Center. For detailed steps in submitting a Blogger site and sitemap to MSN Live Search please refer to my article Add a Blogger Sitemap to MSN Live Search


Submit Your Site and Sitemap to Moreover.com
Historically submitting your Blog sitemap to Moreover.com expedited indexing in MSN because of a standing arrangement that Moreover would provide the submitted feeds to MSN for crawling and indexing. At the time of writing this article it is not clear if this is still useful as sitemaps can now be submitted to MSN directly. However, it can't do any harm so I suggest giving it a go.

To submit a sitemap to Moreover copy and paste the following line into your internet browser address taking care to replace yoursitename with the actual name of your site:


http://api.moreover.com/ping?u=http://yoursitename.blogspot.com/rss.xml


If all is well you will receive the success message.
message:

Thank you for your ping.


Submit Your Site and Sitemap to Ask.com
It is worth submitting your sitemap to Ask.com, previously known as Ask Jeeves. It is considered an important search engine and owns Excite, Bloglines, MyWay and iWon. Ask.com also is a participant in the Sitemaps Protocol Program.

It is easy to submit your Blogger sitemap to Ask.com. Simply copy (Ctrl + C command) and paste (Ctrl + V command) the following line into your internet browser address bar. Be sure to substitute yoursitename with the actual name of your site.


http://submissions.ask.com/ping?sitemap=http://yoursitename.blogspot.com/rss.xml


Provided there are no issues you will see the success screen:


This article explored how to go about submitting your blog and sitemap to 5 major search engines: Google, Yahoo, MSN Live Search, Moreover.com and Ask.com

Related Posts
Submit Your Blogspot Blog Sitemap to Google
Submit Blogspot Sitemap to Yahoo
Add a Blogger Sitemap to MSN Live Search
10 Tips for Blogspot Bloggers on Building Site Traffic
Read Full Post ...

Thursday, August 25, 2011


How to Create Search Engine Friendly Permalinks for Blogger Posts

What are Permalinks?
Permalinks are the permanent links to a post page. Blogger automatically generates a permalink based on the title of your post. Permalinks provide information to the viewer about the kind of content being pointed to.

Permalinks create permanent links to your Blogger posts which are indexed by search engines such as Google. Search engines use permalinks to categorise posts. Browsers use permalinks to help navigate to your posts. When you hover over a permalink in your browser you can read the post name in the status bar.

The permalink for this article is:


http://howblogworks.blogspot.com/2011/08/improved-permalinks-for-blogger-posts.html


Tips for Working With Permalinks in Blogger
While other blogging software such as Wordpress allows the user to edit permalinks Blogger has no such feature. For this reason care needs to be taken when creating titles for your posts as the permalink generated from the title can't be changed later. While your article is in draft form you can continue to change the title as many times as you like. However, once the permalink is assigned at the point that the post is published it remains the same no matter how many times you change the title of your post.

Another issue with Blogger is that it takes only the first 35-40 characters of your title to create the permalink so if you have a longer title you can run into problems. My suggestion is that you design your titles carefully if you want to avoid losing the end characters from your permalink. For instance a long title such as the one below would result in a shortened permalink which would lose the important fact that this post is related to working with Blogger:


http://howblogworks.blogspot.com/2011/08/how-to-create-search-engine-friendly-permalinks-for-blogger-posts


Fortunately there is a way around this problem. You will need to publish and then republish as I did with this post. The method involves creating a shorter title that will adequately summarise the content of your post (eg Improved Permalinks for Blogger Posts) and then publishing your post. Now go back and change the title to the one you prefer. In this case I changed the title to "How to Create User Friendly Permalinks For Your Blogger Posts." Now your title can be as long as you like. As you can see mine is longer than 40 characters. The permalink, however has remained the same even though the title has changed.

You can use this trick to create eye catching and memorable titles. It will also ensure that the permalink reflects a concise title and that unnecessary details in the permalink are removed. Creating concise permalinks is important for Search Engine Optimisation. Read more about Search Engine Optimisation in the blog tutorial Tips for Search Engline Optimisation.

Related Articles
List of How Blog Works Tutorials for Blogger Blogs

Adjust Blogger Title Tags for Improved SEO
Read Full Post ...


Adjust Blogger Title Tags to Improve SEO

This Blogger tutorial explains how to improve search engine optimization (SEO) of your Blogger blog (Blogspot blog) by optimizing your post title tags for search engines like Google and Yahoo. How to improve search engine results by optimizing post title tags.

By default your Blogger blog (Blogspot blog) does not have search engine optimised title tags. This puts your blog at a disadvantage compared to other blogs that have inbuilt SEO or enhanced SEO modules as these sites are likely to be placed more highly in search engine results.

The title tags of your blog are ordered by blog name first followed by the title of the post. This is not ideal for popular search engines like Google and Yahoo which give more importance to the first words of a title. By way of example take a look at how the title tags of this blog were viewed in a browser before any SEO. Note the order of the tags: Blog Name | Post Name.


When this site was first indexed by Google this is the search engine results this site received. Note how the blog name is first in all the results.


Fortunately there is a simple tweak to your template which can rectify this problem. By simply reversing the position of the blog name and page title significant improvement can be gained in search engine results. See the difference in the example below:


Follow the step by step guide below to achieve higher rankings in search engine results.

Tweak of Title Tags for New Blogger (beta) Blogs

1. Login to your blog at Blogger.com and navigate to Design > Edit HTML

2. Backup your template by downloading it to your computer. This will ensure that you can upload your template before these changes in case of problems.

3. Replace the following line of code (about 5-10 lines from the top):


<title><data:blog.pageTitle/></title>


with (highlight code, Ctrl + C to copy)


<b:if cond='data:blog.pageType == &quot;item&quot;'>
<title><data:blog.pageName/> |
<data:blog.title/></title>
<b:else/>
<title><data:blog.pageTitle/></title>
</b:if>


4. Click on Save Template and then View Blog. Navigate to an individual post. You will see that your page title is now first followed by your blog title. A pipe symbol separates the two.


Below is an example of the change in search engine results since the tweak was implemented for this site. Since optimising for search engine friendly page titles there has been a significant improvement in traffic accessing the site. This didn't happen right away but if you too implement this page title tweak and continue to deliver quality content you are on your way toward higher search engine rankings.


Troubleshooting
Several readers have reported issues with the line:


<b:if cond='data:blog.pageType == &quot;item&quot;'>


If you experience problems try inserting this line instead which works on many blogs. Ensure you have double quote marks around item followed by a single quote mark:


<b:if cond='data:blog.pageType == "item"'>


For more on this please read the comments section.


This Blogger tutorial (Blogspot tutorial) has discussed how to adapt the title tags of a Blogger (Blogspot) blog to improve search engine optimization (SEO) by Google,Yahoo and other search engines.

Related Articles
List of How Blog Works Tutorials for Blogger Blogs
Blogspot Blogger SEO Tips and Tricks
Read Full Post ...

Tuesday, August 23, 2011


Increase Google Page Rank Blogger Blogspot

Today I continue my series of articles on search engine optimization SEO for a Blogger Blogspot blog. The focus of this article is on increasing the Google Page Ranking of your Blogger Blogspot blog. If your blog is like mine and relatively new you will find getting off the lowest rung of the Google Page Ranking a bit of a mission but it can be done particularly if you use solid SEO techniques.

To recap search engine optimization is the process of making your website search engine friendly. As major search engines like Google and Yahoo will drive most of the traffic to your blog the more search engine friendly your blog is the more traffic you are likely to receive.

There are a number of SEO - search engine optimization techniques you can employ on your blog to boost traffic such as adjusting titles tags, making use of meta tags, using keywords and keyword phrases, improving keyword density, submitting your blog sitemap to search engines. I have discussed these in detail in my article SEO Tips for Blogspot Blogger blog.

I have already written a number of other articles about SEO for Blogger Blogspot blogs too including the following articles so if you want help with basic search engine optimization try these:

How to Create Search Engine Friendly Permalinks for Blogger
Add Breadcrumb Navigation to Blogger Blogspot Blog
Add Meta Tags to Blogger Blogspot Blog for Better SEO
Adjust Blogger Title Tags for Better SEO
How to Add a Blogger Sitemap to Major Search Engines
Submit You Blogspot Blog to Yahoo
Add Blogger Sitemap to MSN Live
10 Tips to Build Traffic for Blogspot Blogger Blog

Once you've started employing these SEO (search engine optimization) techniques and tips you are going to want to measure your blog's progress. Two important tools that measure the popularity of websites are Google Page Ranking and Alexa Ranking.

Improve the Google Page Ranking of Your Blogger Blogspot Blog
Google Page Ranking is a tool which ranks websites listed in the Google search engine. Websites are ranked on a scale of 0-10 with 0 being the lowest possible score for a site and 10 the highest. The higher the page ranking of your site, the greater the amount of traffic it receives in comparison to other sites. Check your Google Page Rank.

Google uses a complex formula to rank websites which I am not going to cover here. However there are some basic tips about Google Page Ranking that are useful for any Blogger webmaster to know.
  1. Make sure your posts are keyword rich.
    Google expects good usage of keywords so make sure your Blogger blog posts have a density of 3-5%. Keyword density is calculated by the number of keywords divided by the number of total words on a page. If your blog article is 500 words long and has 10 keywords it has a keyword density of 2%. A keyword density of anywhere between 2% and 7% is considered an acceptable range by Google. Anything percentage higher than 7% may well be regarded as keyword stuffing and your blog is likely to be penalized. You can check the keyword density using tools like

  2. Post to your blog frequently
    Make sure you post frequently as Google prefers fresh pages and does not like out of date sites

  3. Create internal links
    Link to previous articles you have written. If you have not cross linked as you posted it is probably worth going back and doing this even if it is a bit arduous.

  4. Build external links to other sites on an ongoing basis
    Build links on a regular basis by commenting on other related blogs and in forums. Add social bookmarking buttons to your blog to encourage readers to bookmark and share your articles. Be aware though that many sites such as Reddit, Digg and del.icio.us implement the link attribute rel="nofollow" which will not boost your ranking.

    Ensure your blog is properly indexed by major search engines. List your blog in blog directories. Watch out for blog directories though as some require you to put a link on your blog but do not reciprocate with a link. See my article on getting listed in blog directories for further help.

    It is worthwhile to link to other blogs you may own as well but doing this will not boost your page ranking particularly. Google is weighted to give a higher ranking to links from other high ranking blogs especially if they are relevant to the content of your blog. The higher the ranking of the site externally linking to yours the better. So essentially you can't just create a bunch of blogs and link to them with the expectation that your Google Page Rank will miraculously increase overnight. Far better to spend your time concentrating on creating a small group of links to quality sites with a high Google Page Rank than going all over the net creating links to low ranking sites.
  5. Another aspect to consider when building quality external links is to ensure that your keywords and phrases appear in links which point to your site. Google analyzes these links so have the linking text contain your keywords to get the most out of them.

Check the Ranking of Your Blogger Blogspot Blog in Alexa
Alexa.com is a website that measures the traffic levels of websites. An Alexa rank is measured according to the amount of users visiting your website with the Alexa toolbar installed and takes into account page views, number of users and three months of historical data.

The Alexa rank is measured according to the amount of users who’ve visited a website with the Alexa toolbar installed. This is kind of an odd way to measure traffic but that is how it works. However it is a well established measure of the value of your site against others so it is useful to see how highly your blog is rated in Alexa. Provided your blog has been around a month or two you can check out how your blog is ranked by visiting Alexa's site info page


Alexa supplies you with statistics and information about your blog's traffic and ranking in handy graphical format


If you want your Blogger Blogspot blog to improve its Google Page Ranking concentrate on building quality external links. Google likes it when your site is getting linked to by other sites. The more the content is related the better. In this article I have given you some pointers about how to boost the Google Page Ranking of your Blogger Blogspot blog. If you have time let me know how you get on. Particularly how quickly you got off the Google Page Rank of 1 and how you did it. I'm sure other readers would be interested too.


Related Articles
List of How Blog Works Tutorials for Blogger Blogs
Blogger Blogspot SEO Tips and Tricks
How to Create Search Engine Friendly Permalinks for Blogger
Add Breadcrumb Navigation to Blogger Blogspot Blog
Add Meta Tags to Blogger Blogspot Blog for Better SEO
Adjust Blogger Title Tags for Better SEO
How to Add a Blogger Sitemap to Major Search Engines
Submit You Blogspot Blog to Yahoo
Add Blogger Sitemap to MSN Live
10 Tips to Build Traffic for Blogspot Blogger Blog
Get Your Blogger Blogspot Blog Listed in Blog Directories
Read Full Post ...


Add Meta Tags to Blogger for Better SEO

In this Blogger tutorial I will show you the best way to add meta tags to your Blogger blog (Blogspot blog) to improve the SEO of your blog and work around the limitations of the Blogger platform.

I have observed that there are many Blogger help blogs out there telling you to just add meta tags however this will very likely achieve the opposite result from the one you are after. Whether you are yet to add meta tags or you have added meta tags already make sure you read and follow the methods contained in this article to get the best results.

What are Meta Tags?
Meta tags are HTML tags that provide additional information about your blog that is unseen by visitors but available to search engines. The meta description tag, for example, provides a short summary of the page content. The keyword meta tags show the keywords and keyword phrases a visitor might use to find your blog. Because of abuse of meta tags search engines have become smarter and most no longer place emphasis on keywords to establish page ranking however keyword meta tags are still used by some search engines so it is a good idea to include them.

Limitations of Blogger and SEO
One of the disappointing aspects of Blogger is that it is not properly optimized for SEO. Meta descriptions and keywords are not supported by blogger.com by default. Title tags are also not optimized. This means that you will miss valuable opportunities to attract visitors to your blog.

However meta tags and meta descriptions can be inserted into your Blogger template (Blogspot template) to good effect. Fortunately these work arounds will go a long way to improving the placement of your blog in search engine results. Please refer to adjust Blogger title tags for improved SEO for help with title tags.

Simply placing a meta tag description in your Blogger template is problematic because Blogger will use the same meta tags for all pages in your blog. This means that every entry that Google has for your site will show in search results with the same description. This solution would result in reduced traffic rather than increased traffic. However there is a way to add meta tags to the home page of your blog only which will not affect post pages in your blog. In this way visitors will find the home page of your blog in search engines by the use of appropriate keywords and a site description.

How to Add Meta Tags to a Blogger Blogspot Blog Home Page
1. Login to Blogger if not already logged in

2. Navigate to Design > Edit HTML

3. Back up your template as a precaution by downloading full template to your computer.

4. Check the Expand Widget Templates box

5. Find these lines which will be near the top of your template:


<head>
<b:include data='blog' name='all-head-content'/>
<title><data:blog.pageTitle/></title>


6. Paste the following code immediately below <title><data:blog.pageTitle/></title>


<b:if cond='data:blog.url == data:blog.homepageUrl'>
<meta content='Place your blog description here' name='description'/>
<meta content='Place your blog keywords here(separated by commas)'
name='keywords'/>
</b:if>


7. Enter your blog description between the single quote marks under description. Maximum 150 characters

8. Enter the keywords of your blog between the single quote marks under keywords. Ensure you separate each keyword or keyword phrase by a comma. Make sure your keywords do not exceed 200 characters

By way of example here are the meta tags I use for the home page of How Blog Works:


<b:if cond='data:blog.url == data:blog.homepageUrl'>
<meta content='Find tips,tricks,tutorials,walkthroughs to customize your Blogger Blogspot blog.SEO,Banners,Adsense,gadgets,fixes,feeds,rss,help for beginner bloggers' name='description'/>
<meta content='blog,blogger,blogger.com,blogspot.com,blogspot,blogging,tutorials,tips,blogger help,customize blogger,SEO,make money,gadgets,Google Adsense,banners, feeds,analytics,solutions'
name='keywords'/>
</b:if>


9. Click on the Save Template button

10. To see your description in action you can either navigate to your blog's home page and click on view source in your browser. In Internet Explorer you will find this option in the view menu. A text document will appear which you can scroll through. You will see your description near the top of the document. Alternatively you can check your description in a free Meta Tag Analyzer tool such as Submit Express or SEO Centro


How to Add Meta Tags to a Blogger Blogspot Blog Individual Post
1. Follow steps 1 to 4 as for adding meta tags to the Home Page

2. Add the following in the <head> section of your Blogger template. Enter this code below the Home Page code above you have just entered:


<b:if cond='data:blog.url == "http://url of your post"'>
<meta content='keywords pertaining to your post' name='keywords'/>
<meta content='crafted description of your post' name='description'/>
</b:if>


Here is an example of optimized meta tags for this post:


<b:if cond='data:blog.url == "http://howblogworks.blogspot.com/2011/08/adjust-blogger-title-tags-to-improve.html"'>
<meta content='meta tags,optimize blogger,blogger SEO,search engine optimization, blogspot,blogger,blogspot.com,blogger.com,blogging,blog' name='keywords'/>
<meta content='Improve SEO by adding meta tags to your Blogger Blogspot blog. Step by step tutorial shows you how to add meta tags to the home page and a single post' name='description'/>
</b:if>


3. Add your post URL, keywords and description. To find the URL of your post navigate to the post's page and copy the link showing in the address bar of your browser including the http:// prefix

4. Click on the Save Template button

5. To check your description you can use the view source in your browser once you have navigated to the post page or a meta tag analyzer

Note: This method is suitable if you have a few key posts that you want to ensure you get maximum traffic on. If you have a lot of posts this manual method would be very tedious. I don't know of any automated method or script to add meta tags at this point but I am investigating it and will keep you posted.


Analyze Your Blogspot Blogger Meta Tags
Once you have added meta tags to your blog you can use tools to analyze them to ensure their relevance. Aim for meta tag relevancy to page content of above 90%. To check this you can use a free meta tag analyzer tool such as Submit Express or SEO Centro


Troubleshooting and Tips
  • Observe Character Limits
    To avoid problems ensure that you keep within the maximum character limits:


    Title Tag - Maximum Characters is 60
    Site Description - Maximum Characters is 150
    Keywords - Maximum Characters is 200

  • Title Tag Tweak
    If you have inserted the title tag tweak and it is highly recommended that you do so then you will need to add the code above after the title tag adjustment in the <head> section of your template. Read more about adjusting title tags
  • Keywords
    Although some search engines no longer place too much emphasis on keywords some still do so it is worth adding keywords. Avoid using the same keyword more than 3 times. The maximum number of keywords recommended to be robot friendly is around 20.
  • Problems Reading the Code
    Some readers have reported problems with their browser reading this code. Try this document form of the article if this happens to you

In this Blogger meta tag tutorial I have discussed the best way to add meta tags to a Blogger blog (Blogspot blog) to improve search engine results given the limitations of the Blogger platform. In this article you have learned to add both meta tags for keywords and descriptions to the home page. You have also learned how to add meta tags to an individual post. To optimize your meta tags I have included links to free meta tag analyzer tools.


Related Articles
Adjust Blogger Title Tags for Improved SEO
10 Tips to Build Site Traffic for Blogger
List of How Blog Works Tutorials for Blogger Blogs
Add Breadcrumb Navigation to Blogger Blogspot Blog
Read Full Post ...


Add Breadcrumb Navigation to Blogger Blogspot

One way you can improve navigation of a Blogger blog (Blogspot blog) is to add breadcrumb navigation to your Blogger blog. There is also a SEO benefit of installing a breadcrumb as major search engines like Google treat anchor text links as important. In this Blogger tutorial I will guide you through the steps to add breadcrumb navigation to a Blogger blog (Blogspot blog).

Whether you are using a custom template or a default Blogger template breadcrumb navigation can be added. It is not difficult and I have updated these instructions to take account of the new generation of default Blogger templates eg Simple.

What Will a Breadcrumb Do on My Blog?
Adding a breadcrumb to your blog provides a form of text-based navigation. A breadcrumb displays the visitor's location within a blog. The advantage of a breadcrumb is that it provides shortcuts to enable visitors to quickly get around your blog by jumping from one part of your blog to another.

To illustrate how adding a breadcrumb would work in your blog let's use an example. A breadcrumb for an individual post would follow this format:


Home > Label > Post Title


Using this post as an example a breadcrumb might be Home > Navigation > Add a Breadcrumb to Blogger Blogspot Blog. In cases where there is more than one label this hack uses the last label listed. If a visitor wanted to look at other posts about navigation all they need do is click on the "Navigation" link in the breadcrumb and they will be taken to a page which will show them all the posts with the "Navigation" label.


SEO Benefits of a Breadcrumb
Apart from improving the navigation of your Blogger blog adding a breadcrumb also has SEO benefits. Anchor text such as labels tells search engines about the subject of the linked page. Search engines view a breadcrumb with a text link to relevant keywords in the post as important. Read more about SEO try the following articles:

Blogger Blogspot SEO Tips and Tricks
Add Meta Tags to Blogger for Better SEO

How to Add a Breadcrumb Navigation to your Blogger Blog
It is not difficult to add a breadcrumb to your blog but it does involve adding a snippet of code to your template. Below is a step by step walkthrough which I have aimed at beginners so that anyone reading my blog will be able to follow the instructions. Credit to Hoctro for this hack.

1. Login in to Blogger if you are not already logged in

2. Navigate to Design > Edit HTML

3. Back up your blog using Download Full Template as a precaution in case you accidently overwrite some code and are not able to retrieve it.

4. Check the Expand Widget Template box

5. Add the following CSS code above this line ]]></b:skin>


.breadcrumbs {float: left;width: 590px;font-size: 11px;margin: 5px 10px 20px 10px;padding: 0px 0px 3px 0px;border-bottom: double #EAEAEA;}


Once your breadcrumb is working modify this if you need to so that it blends with the look and style of your template.

6. Find this line of code <b:includable id='main' var='top'>

7. Older XML Blogger templates and custom templates replace the entire block of code below. If you are using the new generation of Blogger templates such as Simple look for alternative instructions further down in this Step)


<b:includable id='main' var='top'>
<!-- posts -->
<div class='blog-posts hfeed'>
<b:include data='top' name='status-message'/>
<data:adStart/>

with

<b:includable id='main' var='top'>
<!-- posts -->
<div class='blog-posts hfeed'>
<!-- disable default status message
<b:include data='top' name='status-message'/>default status message disabled -->
<b:include data='posts' name='breadcrumb'/><data:adStart/>


Note: if you are using the new generation of Blogger templates eg Simple then do the following instead

Find this code block and add the code in red between <div class='blog-posts hfeed'> and <data:defaultAdStart/>


<b:includable id='main' var='top'>
<b:if cond='data:top.showPlusOne'>
<script expr:src='data:top.plusOneJsUrl'/gt;
</b:if>
<!-- posts -->
<div class='blog-posts hfeed'>
<!--Breadcrumb Hack - disable default status message
<b:include data='top' name='status-message'/>default status message disabled -->
<b:include data='posts' name='breadcrumb'/>

<data:defaultAdStart/>


8. Now immediately before <b:includable id='main' var='top'> paste the following large block of code:


<b:includable id='breadcrumb' var='posts'>
<b:if cond='data:blog.homepageUrl == data:blog.url'>
<!-- No breadcrumb on front page -->
<b:else/>
<b:if cond='data:blog.pageType == "item"'>
<div class='breadcrumbs'>
Browse » <a expr:href='data:blog.homepageUrl' rel='tag'>Home</a>
<b:loop values='data:posts' var='post'>
<b:if cond='data:post.labels'>
<b:loop values='data:post.labels' var='label'>
<b:if cond='data:label.isLast == "true"'> » <a expr:href='data:label.url' rel='tag'><data:label.name/></a> </b:if> </b:loop>
» <span><data:post.title/></span> </b:if> </b:loop> </div>
<b:else/>
<b:if cond='data:blog.pageType == "archive"'>
<div class='breadcrumbs'>
Browse » <a expr:href='data:blog.homepageUrl'>Home</a> » Archives for <data:blog.pageName/> </div> <b:else/>
<b:if cond='data:blog.pageType == "index"'>
<div class='breadcrumbs'>
<b:if cond='data:blog.pageName == ""'>
Browse » <a expr:href='data:blog.homepageUrl'>Home</a> » All posts <b:else/>
Browse » <a expr:href='data:blog.homepageUrl'>Home</a> »
Posts filed under <data:blog.pageName/>
</b:if> </div> </b:if> </b:if> </b:if>
</b:if>
</b:includable>


9. Click on Save Template button

10. Click View Blog and navigate to any post page to see your new breadcrumb in action

Add a Breadcrumb Based on Archives
Follow this hack provided by Purple Moggy if you would like to add a breadcrumb based on year and month. Likely format would be: Home > Year > Month > Blog Title

Tips and Troubleshooting
Some browsers have problems displaying the code above. If experience any issue then use the code in this link Add Breadcrumb Navigation to a Blogger Blog


In this Blogger tutorial you have learned how to add breadcrumb navigation to your Blogger blog (Blogspot blog) to improve SEO and site navigation. Please let me know how you get on. Good luck!


Related Articles
List of How Blog Works Tutorials for Blogger Blogs
Blogger Blogspot SEO Tips and Tricks
Add Meta Tags to Blogger for Better SEO
Read Full Post ...