Showing posts with label Monetize Blogger. Show all posts

Friday, September 30, 2011


How To Remove Low paying Adsense Ads

To increase your Adsense Earnings by removing the lowpaying adsense ads from your account,follow the steps below.

1.First go to www.adsblacklist.com .


2.Now Signup for a account.it's free and very simple.

3.Now login to your account.

4.Now Click on My Account.


5.Now click on 'Add New Domain'


6.Submit your URL,TITLE and Keywords.Look at the example below.


7.Now go to Generate Filter List.


8.Drag and drop your domain name into 'Keywords from selected domains:' box.Then you can see keywords,you give in step 4.

9.Now select 'MFA' and 'LCPC'.


10.Now click on Submit.

11.They will give you lowpaying ads urls.copy these urls.

12.Now login to your Google Adsense Account.

13.Click AdSense Setup.


14.Go to Competitive Ad Filter category.


15.Paste lowpaying ads urls into the box and click save changes.


16.Now google will not display low paying ads in your site.

Related Articles
List of How Blog Works Tutorials for Blogger Blogs
Make Money With Adsense Keywords and Blogger
5 Easy Ways to Make Money from Blogger
Bloggers Guide to Google Adsense Myths
Read Full Post ...

Sunday, September 04, 2011


Guide to Blogger Blogspot FAQs


Guide to Blogger Blogspot FAQs. When you are looking for help with Blogger Blogspot you want to get that help as fast as possible that's why I have created a list of the most commonly asked questions by visitors to my blog. Use this post as a ready resource for all your frequently asked questions about blogging using the Blogger Blogspot blogging platform.


  • Banners and Advertising
  • Building Site Traffic
  • Common Blogger Problems Fixes
  • Customize Blogger
  • Gadgetize Blogger
  • Google Adsense
  • Monetize Blogger
  • Posting and Commenting
  • Publicize Blogger
  • Search Engine Optimization
  • Social Media
  • Tracking Site Visitors


Banners and Advertising FAQ
Where can I post a banner on Blogger Blogspot?
It is possible to add an affiliate banner to Blogger in a number of places. You can add a banner to the Blogger, above the header, above the first post, within a post, below a post, in a sidebar, and in a footer.

How do I place an advertising banner in a Blogger header?
Add an Affiliate Banner to the Blogger Header

How do I place an advertising banner in a Blogger sidebar?
Add an Affiliate Banner to Blogger Sidebar

How do I place an advertising banner above the Blogger header?
Add Google Adsense or banner above the Blogger header


Build Site Traffic
How do I encourage more visitors to my blog?
Find 10 hot tips to help you get visitors to your Blogger Blogspot blog
10 Tips to Build Traffic to a Blogspot Blog

Why do I need to add my blog to blog directories?
It is not essential to add your Blogger blog to blog direcories but it is a good idea since they are a valuable link and a ready source of traffic for your blog and Submit a Blogger Blog to Blog Directories

What blog directories should I add my blog to?
There are many blog directories on the net and more springing up all the time. For some recommended blog directories check out this article:
Submit a Blogger Blog to Blog Directories


Common Blogger Problem Fixes
How do I remove the navbar from Blogger?
You can't actually remove the Blogger navbar but there is a trick to hide it.
Hide Remove Blogger Navbar

How do I reinstate a deleted Blogger navbar?
I am often asked how to fix a deleted Blogger navbar. Find the solution in:
Hide Remove Blogger Navbar

How do I fix the missing comments form below posts? 
Many custom templates were created prior to Blogger embedding the comments form below posts. For details on how to upgrade your Blogger template to include an embedded comments form below posts on the single post page please refer to:
Add Missing Embedded Comments Form to Blogger

How do I fix the missing add a gadget in the layout screen?
If you can no longer see Add a Gadget in Layout > Page Elements then there is very likely a problem with your browser cache. Check out:
Missing Add a Gadget Solution in Blogger


Customize Blogger
How do I add categories to Blogger?
Blogger doesn't have categories only labels. If you want to add a categories section you can using a linked list but you will need to update it manually.
Add a Categories Section to Blogger

How do I add a list of recent posts to Blogger?
By making use of your blog's feed you can display the 5 most recent posts on your blog.
Add a Recent Posts Feed to Blogger

How do I display a list of recent comments on Blogger?
By making use of your blog's feed you can display the 5 most recent comments on your blog.
Add a Recent Comments Feed to Blogger


Gadgetize Blogger
How do I add a Live Traffic feed to my blogger Blogspot blog?
If you insert a free live traffic feed like Feedjit on your blog you will be able to watch visitors arrive at your blog in real time and gather information about where they came from, where they exited to, eearch engine keywords and keyword phrases used to access your blog.
Add Feedjit Live Traffic Feed to Blogger

How do I add a ratings widget to Blogger?
If you've seen star ratings on blogs you've visited lately and you would like to add one to your blog check out my article on the Outbrain ratings widget:
Add Outbrain Ratings Widget to Blogger

How do I add a bookmarking button to my blog?
Your visitors can share your posts with friends and add an online bookmark with an Add This Social Bookmarking button
Add a Social Bookmarking Button to Blogger

How can visitors subscribe to my blog?
You can encourage readers to sign up to regular updates of your blog by adding a subscribe button or link to your blog.
Add an Email Subscription Form and Links to Blogger Blogspot Blog


Google Adsense FAQ
Can I put Google Adsense on my Blogger Blogspot blog?
Yes you most certainly can. Unlike other online blogging platforms like Wordpress Blogger permits Blogger publishers to add Google Adsense to any Blogger blog. However be aware that spam blogs - that is blogs specifically set up to make money from Google Adsense are prohibited by Blogger.

How much money can I make from Google Adsense?
If your blog receives enough traffic (75+ visitors per day) you will be well placed to earn revenue from your Blogger Blogspot blog. Want to know more refer to:
Google Adsense Myths for Blogger Blogs

How Many Google Adsense Ad Units Can I Place on a Blogger Blog?
Google allows 3 content ads, 3 link ads and 2 search boxes on any given page. These rules are subject to change so if in doubt check Google Adsense FAQ.

How do I add Google Adsense to Blogger?
You will find many tips on the basics of adding Google Adsense to Blogger in this article:
Google Adsense Tips for Blogger

Where should I place Google Adsense on Blogger?
Better Placement of Google Adsense on Blogger
Blogger Guide to Google Adsense Placement


Monetize Blogger
How do I add a donate button?
Adding a Paypal donate button to a Blogger Blogspot blog will encourage satisfied visitors to say thanks.
Add a Paypal Donate Button to Blogger

How do I make money from my Blogger blog?
5 Easy Ways to Make Money from a Blogger blog


Posting and Commenting in Blogger
Why do the links to my post titles get shortened?
When you publish an article in Blogger a permalink gets created. If the title of your post is longer than about 35-40 characters Blogger shortens it. Check out this article for ideas on how to work around this issue
How to Create Search Engine Friendly Permalinks

How do I post date my posts?
Blogger allows publishers to post date their posts. Read the following article to find out more about how to set a future publishing date for a post
Choose Your Own Blogger Post Date

How do I date my posts with a date that has already passed?
Blogger will let you set a date for a post in the past, present or future. Find out more by reading the following article:
Choose Your Own Blogger Post Date


Publicize Blogger
Why is it important to burn my Blogger feed?
there are quite a few reasons reasons why it is a good idea to burn your Blogger Blogspot feed at Feedburner check out this article to find out more:
Blogger RSS Feeds and Feedburner

How do I burn my Blogger feed at Feedburner?
If you would like to burn your Blogger feed at Feedburner to build readership of your blog then this indepth article will show you how:
Burn Blogger RSS Feeds at Feedburner

How do I add a FeedFlare to a Blogger feed?
Not only will a Feedburner FeedFlare encourage your visitors to share your posts on various social media sites it will also copyright your material if you add this notice to the bottom of your posts. Learn more about Feedburner FeedFlares:
Add a Feedburner FeedFlare to a Blogger Feed


Search Engine Optimization
How do I get my Blogger Blogspot blog listed by major search engines?
If you wait for search engines to crawl your blog it may take a long time to appear in search engine results. You can speed up this process by submitting your blog and a sitemap to major search engines. Find out more:
Add Your Blog to Major Search Engines

How do I get listed by Yahoo?
For instructions on how to let Yahoo know about your blog and add a Blogger sitemap to Yahoo follow this guide:
Submit Your Blogspot Blog to Yahoo


Social Media
How do I add bookmarking button to my blog?
There are a number of ways to add social media to your blog. One easy way is add an all in one social bookmarking button by Add This.
Add a Social Bookmarking Button to Blogger

How do I add Twitter Links to Blogger?
How to Add a Twitter badge to Blogger
How to Add a Twitter Followers Counter to Blogger


Tracking Site Visitors
How do I know who is viewing my Blogger Blogspot blog?
There are a number of programs that can help you track visitors to your blog. One of the best, Google Analytics is provided free by Google. For more about Adding Google Analytics to a Blogger Blog

What gadget lets me watch visitors as they arrive?
If you want to see visitors arrive at your Blogger Blogspot blog you can put a free Feedjit live traffic feed widget on your Blogger sidebar.
Add Feedjit Live Traffic Feed to Blogger


Related Articles
List of How Blog Works Tutorials for Blogger Blogs
Read Full Post ...

Friday, August 26, 2011


Add Affiliate Banner Below Post in Blogger

In today's Blogger tutorial you will learn just how easy it is to place an affiliate banner at the end of each post of a Blogger blog (Blogspot blog). This is a relatively easy task but does require adding a short snippet of code to your Blogger template. For those new to Blogger or without much technical knowledge don't worry as I have broken down the steps so that anyone can follow them even virtual beginners.

For instructions on how to add affiliate banners to other areas of a Blogger blog (Blogspot blog) please consult these tutorials:

Add an Affiliate Banner or Adsense Above Blogger Header
Add an Affiliate Banner to Blogger Header
Add an Affiliate Banner to Blogger Sidebar

How to Add an Affiliate Banner Below a Blogger Post
The instructions below will place an affiliate banner below each post in your blog. The banner will appear on all pages including the home page. If you want faster loading times and the banner to appear only on individual post pages see tips and troubleshooting below for instructions on how to restrict the banner display to post pages only.

1. Login to Blogger if not already logged in

2. Navigate to Design > Edit HTML

3. Back up your Blogger template as a precaution by downloading to your computer

4. Check the Expand Widgets Template box

5. Find the following lines in your Blogger template with CTRL + F to bring up the search box


<div class='post-footer-line post-footer-line-3'/>
</div>


6. Paste your affiliate banner code between these two lines


<div class='post-footer-line post-footer-line-3'/>
Place the affiliate banner code here
</div>


Once you have finished your code should like something like the following which places a horizontal banner (468x60) in the post footer but any size banner can be inserted below each post provided your template is wide enough to accommodate it:


<div class='post-footer-line post-footer-line-3'/>
<a href='https://chitika.com/publishers.php?refid=XXXXXX' style='text-decoration: none;' title='Get Chitika | Premium'><img alt='Get Chitika | Premium' border='0' src='http://scripts.chitika.net/eminimalls/logos/468x60.png' title='Get Chitika | Premium'/></a>
</div>


7. Save Template

8. Click on View Blog to see your new affiliate banner in action


Get Chitika Premium

Tips and Troubleshooting
  • If your template does not have these lines it may only have two post footer lines in which case you can do one of two things

    1. Add these lines to your template:


      <div class='post-footer-line post-footer-line-3'/>
      Place the affiliate banner code here
      </div>

    2. Or place the affiliate banner code between the following lines:


      <div class='post-footer-line post-footer-line-2'/>
      Place the affiliate banner code here
      </div>

  • If you would like the banner to appear below your post only on the post page and not the home page then you will need to add an if statement to the code as follows:


    <div class='post-footer-line post-footer-line-3'/>
    <b:if cond='data:blog.pageType == "item"'>
    Paste affiliate banner code here
    </b:if>
    </div>

  • If you are having problems adding the affiliate banner code to the template make sure that only single quotes are used. The Blogger template code is sensitive to this and usually doesn't accept double quotes

In today's Blogger tutorial you have learned how to place an affiliate banner at the bottom of a post in a Blogger blog (Blogspot blog). This banner will be the same for each post and only displays on the individual post page. If you would like to know more about adding banners to Blogger please consult the list of tutorials below.

Related Articles
List of How Blog Works Tutorials for Blogger Blogs
Add Chititka Ads to Blogger Blogspot Blog
Add an Affiliate Banner or Adsense Above Blogger Header
Add an Affiliate Banner to Blogger Header
Add an Affiliate Banner to Blogger Sidebar
5 Ways to Make Money from Blogger
Blogger Guide to Google Adsense Placement
Read Full Post ...


Add an Affiliate Banner to a Blogger Header

If your intention is to make money from your blog chances are you will want to add an affiliate marketing banner to your Blogger Blogspot header. Doubtless you have seen plenty of websites sporting advertising banners which are creating revenue for the author by way of banner clicks. With a small amount of tweaking to your Blogger template you too will be in a position to boost the revenue earning capacity of your Blogger blog.


Add an Affiliate Banner to Blogger Header
There are a variety of good places for a banner but the header of a blog is by far the most prominent area. Unfortunately Blogger does not have an easy facility for inserting an advertising banner into your Blogger header. To manage this issue you have two choices:


1. Use a custom template that comes banner ready. (There are a number of templates out there with this feature built-in)

2. Or customize your existing standard Blogger template.


This article focuses on choice 2 - how to go about manually editing your template to add an affiliate banner ad. By the end of this tutorial you will have the necessary knowledge and know how to insert a banner into the header of your Blogger blog. The level of difficulty for the additions I am proposing I have rated as easy to intermediate. You will be adding a snippet of code to your template plus pasting in the affiliate marketing banner code.

For the purposes of this example I will be using a 468x60 banner. I have tested this method of banner insertion on the following standard Blogger templates:


Herbert
Rounders
Denim
Thisaway
Son of Moto
Sand Dollar


It will also work on custom templates that don't already come with an advertising banner in the header built in.


How to Insert an Affliate Marketing Banner into a Blogger Blog

1. Login to Blogger.com and navigate to Layout > Edit HTML page of your blog

2. On the Edit HTML page you will see the option to back up your template by downloading it to your system. I strongly advise that you take this opportunity to backup as you are about to make a change to your template where if something goes wrong you may not be able to restore it.

3. Once you have backed up your template place a check in the Expand Widget Templates box

4. Search your template and locate the following lines of code within the header section of the template:(note you can search by using CTRL + F and entering <b:includable id='main'> into the search box


<b:includable id='main'>
<b:if cond='data:useImage'>


5. Now insert the following 2 lines of code directly below <b:includable id='main'> and before <b:if cond='data:useImage'>

<div class='ads'>
</div>


6. Place your merchant affiliate code between the lines of code you just inserted. You will need to copy the code from the affiliate program provider to your template. If you are yet to sign up for an advertising program such as Linkshare you will need to do so before you proceed. Alternatively you could use my banner code in the meantime to test this banner and later substitute it for your own.


<div class='ads'>PLACE YOUR BANNER CODE HERE
</div>


7. Review the code you have entered. If you have followed the steps above you will now have code that resembles this. (Your affiliate code will of course be different):


<b:includable id='main'>
<div class='ads'>

<a href='http://www.linkworth.com?a=23734' target='_blank'><img align='right' border='0' height='60' src='http://www.linkworth.com/adm/affiliate_manager/affiliate_banners/bann-36.gif' width='468'/></a>

</div>
<b:if cond='data:useImage'>


8. When you are sure you have correctly inserted the code into the template scroll up until you find this line in your template ]]></b:skin>

9. Immediately before this line add the following lines:


/* Header Banner
----------------------------------------------- */
#header .ads{width:480px; height:80px; float:right; padding:20px 0px 0px 0px}


10. Click on Save Template.

11. Click on View Blog to view your new banner.


Troubleshooting
  • If you need to change the alignment or padding around the banner to your own specifications you will need to change the CSS stylesheet code entered in Step 9
  • You can change the alignment of the banner by changing float:right; to float:left; if you would like your banner to left align.
  • If you change your template for another standard Blogger template you may need to re-enter the code in Step 9.

In this tutorial you have learned to how to insert a 468x60 affiliate marketing banner into the header of your Blogger Blogspot blog and will now be on your way to earning revenue from multiple income streams. Well done!!!


Related Articles
List of How Blog Works Tutorials for Blogger Blogs
5 Easy Ways to Make Money from Blogger
Make Money Add Banner Ads to Blogger
Add an Affiliate Banner to a Blogger Sidebar
Add Google Adsense or Banner Above Blogger Header
Read Full Post ...


Add an Affiliate Banner to Blogger Sidebar

A lot of people want to make money from their blog and for this reason want to learn how to insert affiliate banners into their Blogger Blogspot blog. In this Blogger tutorial which is the first of a series I will show you how to place a banner in the sidebar of your Blogger blog (Blogspot blog).

Even if you are new to Blogger and have very little technical knowledge this tutorial is still suitable for you as I will guide you through every step in the process of adding a banner ad to the sidebar of your Blogger blog.

Banner Advertising is an Effective Way to Make Money from a Blogger Blog - Here is a cluster of 3 125x125 banner ads
How to Add an Affiliate Banner To the Sidebar of Your Blog
It is relatively easy to add an affiliate banner to the sidebar of your blog.

1. Sign up with an affiliate marketing program like Commission Junction and select your merchant

2. Decide on the size of the merchant banner or banners you wish to display in your sidebar making sure that whatever you choose will fit into the sidebar space otherwise your banner ad may not display properly on your blog. Typical sizes suitable for sidebars are:


  • small rectangular banners 125x90 or 125x125
  • square banners 200x200 (if space allows)
  • short vertical banners 120x200
  • long column style skyscraper bnnners 120x600 or 160x600


3. Choose your banner and you will be presented with the merchant code to display the banner. Right click to select all and right click again to copy the code to the clipboard of your computer

4. In a new window login to Blogger and navigate to Design > Page Elements

5. Click on Add a Gadget in the sidebar. If you are using a customized template you may have 2 different sidebars so decide which you want the banner ad to display in.

6. Select HTML/Javascript widget from the Add a Gadget menu

7. Place your mouse in the content box of the Configure HTML/Javascript widget and right click. Choose paste to insert the merchant code of your banner ad into the content box

8. In the title box add a Title like Sponsored Ads if you wish otherwise leave it blank


9. Click on Save

10. Using Blogger's drag and drop feature to pick up your new HTML/Javascript widget and position it where you want your banner ad to show up in your sidebar.

11. Save your layout

12. Click on View Blog to see you new banner ad in action.


Add Space Between Your Banner Ads
If you want more space between your banner ad and the previous widget you can add <p> before the code your inserted in the HTML/Javascript widget. If you need even more add another <p>

To Center Your Advertising Banner
If you want to center your banner ad insert <center> before the merchant code and </center> after it.

Add More Than One Banner
If you want to add more than one banner ad to the same widget you can just by pasting the code for the second banner ad below the first lot of code. If you want some white space between the banners ads insert <p> between each lot of code.

Troubleshooting

Your Banner Does Not Display
Your banner ad should appear right away. If your banner ad doesn't display at all then there is a problem with the widget you have just created. Retrace your steps making sure you have got all the code.

Only Placeholder for the Banner Displays
If you see a placeholder but no ad displays then the affiliate website may be off line or there is a problem with the code in some way. Go back and make sure you copied all of the code correctly


In this Blogger tutorial you have learned how to add an affiliate marketing advertisement banner to the sidebar of your Blogger blog (Blogspot blog) and about some common problems that you may encounter. In my next tutorials on banner advertising I will show you how to place a banner in a variety of other spots on your blog including the footer, above the first post and in the header. Why not bookmark this site so you can return easily?

Related Articles
Make Money Add Banner Ads to Blogger
How to Add an Affiliate Banner Below a Blogger Post
How to Add an Affiliate Banner to the Blogger Header
Add Google Adsense or Banner Above Blogger Header
List of How Blog Works Blogger Tutorials
Read Full Post ...


Place Google Adsense Below Post Title in Blogger

I have had a lot of interest in my articles about placement of Google Adsense in a Blogger Blogspot blog. Today I continue the Google Adsense series with an article about how to place your Google Adsense ad unit below the post title in Blogger.

This ad placement requires pasting the Google Adsense code directly into your Blogger template. While not difficult I have rated the skill level as intermediate as it requires parsing (conversion of the Javascript into a format readable by Blogger) of the Google Adsense code first before pasting it into your template. For the benefit of newbies and beginner Bloggers I have broken down the steps to simplify the process and make it more manageable. What follows is a detailed step by step tutorial on how to place Google Adsense below the post title in a Blogger blog including how to create a Google Adsense ad unit if you don't already have one.


Steps to Place Google Adsense Below Blogger Post Title
Follow Steps 1-11 if you don't have a Google Adsense ad unit.

IF YOU ALREADY HAVE A GOOGLE ADSENSE UNIT SKIP TO #12

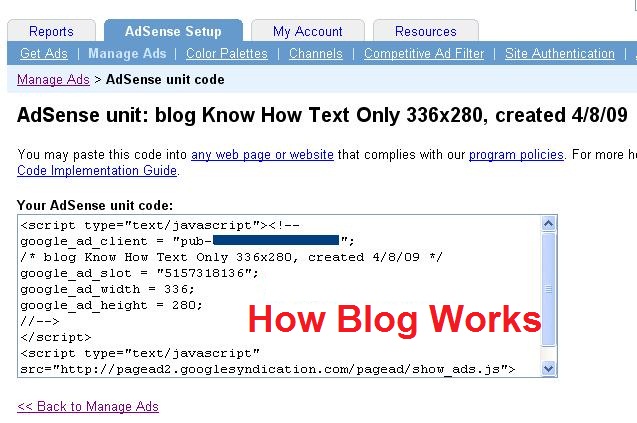
1. From the Blogger Dashboard click on the Google Adsense link at the bottom of the page

2. Proceed to Adsense Setup > Get Ads or sign up for Google Adsense if not already

3. Choose Adsense for Content from the Ad Setup screen

4. Choose Ad unit or Link unit from the Adsense for Content screen. In most cases you will want an ad unit.

5. Choose the Ad Type from the dropdown menu depending on your needs. I often select text only because I think they are better performers but you may have a different experience. Click on the Continue button

6. Choose the Ad Format. Most likely this will be between 336x280, 250x250, or the 468x60 banner sizes.

7. Choose your color palette according to your blog color scheme.


Tip: I find the best way to get the colors for my ads if I am not sure is to create an Adsense unit in Blogger and transfer that color scheme to the new ad unit in Google. Alternatively you can accept the default and change the color scheme later. Changing the color scheme won't affect your ad unit code for your template.


8. Accept the default font in the meantime unless you know the font that you need. You can always check this out later by reviewing your template

9. Click on the Continue button

10. Create an Ad Channel by clicking the link add a new channel. By default Google will add this to Your Selected Channels. Click on the Continue button

11. You may need to give your ad unit a more detailed name. I recommend keeping the dimensions of the ad unit in the name as it makes the unit easily identifiable. I usually add the name of the blog to the name because I have several blogs. Save and Get Ad Code by clicking on the Submit and Get Code button.

START HERE IF YOU HAVE A GOOGLE ADSENSE AD UNIT
12. Copy the Adsense code by right clicking the mouse while it is in the code box. Choose select all and then right click again and choose copy. Make sure you get all of the code


13. Open the Ad Converter by following this link to Centricle.

14. Paste the Google Adsense code into the converter and press the Convert Ad Code button. This will parse the code so that Blogger will read the Javascript properly. Leave this window open for now as we will be returning here. Note that pasting Google Adsense code in to your Blogger template that has not been parsed will produce errors

15. Login to Blogger if not already logged in

16. Navigate to Layout > Edit HTML

17. Back up your Template (recommended) by downloading it to your computer

18. Check the Expand Widgets Template checkbox

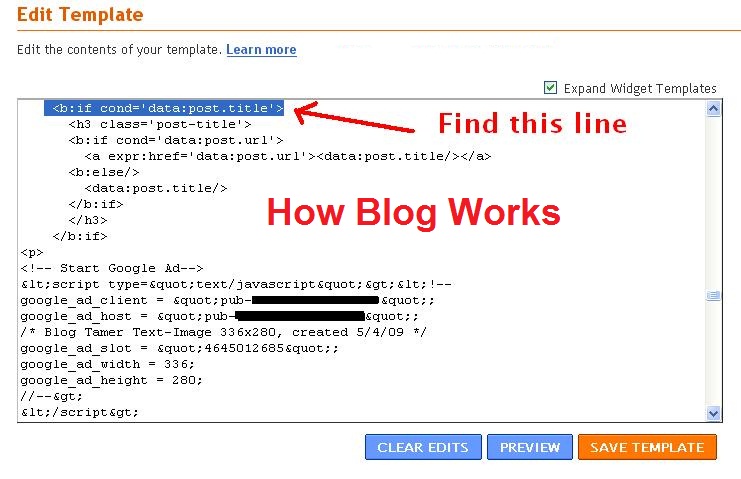
19. Bring up Blogger Search using CTRL + F. Copy and paste the following line of code into the text box to locate the block of code in your template beginning with this line:


<b:if cond='data:post.title'>


Code Block to Find

<b:if cond='data:post.title'>
<h3 class='post-title'>
<b:if cond='data:post.url'>
<a expr:href='data:post.url'></a>
<b:else/>
<data:post.title/>
</b:if>
</h3>
</b:if>


20. Return to the Ad Converter and copy the converted code by right clicking your mouse and choosing select all followed by right clicking again to copy it

21. Paste this code directly after the above code block:


<p>
<!-- Start Google Ad-->
<!-- End Google Ad-->
</p>


22. Paste your Google Adsense ad code between <!-- Start Google Ad --> and <!-- End Google Ad -->


23. Click the Save Template button

24. Take a look at your new Google Adsense ad unit in your blog by following the View Blog link.

Troubleshooting Your New Google Adsense Below the Post Title
  • Note only a placeholder will show up for about the first 10 minutes or so. If no placeholder appears go back and retrace your steps to make sure you haven't forgotten something. Check you have copied the code exactly.
  • If you need more white space between the ad unit and the start of the first line of your article add this html tag <p> before your Google Adsense code and this </p> after the last line of your Google Adsense code
  • If you have Google Adsense ad units in other parts of your blog you will find that only 3 Google Adsense ad units will display on one page at any one time according to Adsense rules. for this reason you may get a placeholder appearing for some of your earlier posts which appear further down the page. To counter this problem I suggest you set the number of posts on a page to 3 if you have no other ad units anywhere else and 2 if you have another unit some where else. Linked units are not included in this only ad units.

In this tutorial I have covered the steps involved in creating a new Google Adsense ad unit at Google Adsense. I have also provided a detailed walkthrough of the steps involved in adding a Google Adsense ad unit below the post title in a Blogger Blogspot blog. Let me know how you get on.

Related Articles
Bloggers Guide to Google Adsense Myths
Add Google Adsense to Blogger Header
Add Google Adsense or Banner Above Blogger Header
Better Placement of Google Adsense in Blogger
Google Adsense Tips for a Blogger Blog
Add a Banner or Google Adsense Above Blogger Header
Read Full Post ...


Add Google Adsense Below Blogger Post

Today's article is for anyone who would like to maximize their Google Adsense revenue of their Blogger Blogspot blog. I will show you how to use a very simple trick to place Google Adsense below the post content but above the post footer credits. This article continues the ongoing Google Adsense series about the placement of Google Adsense ad units in different positions within Blogger.

What's Involved in Inserting this Tweak?
The level of difficulty for inserting this Google Adsense ad placement is rated intermediate. You will need to enter the Google Adsense code directly into your Blogger template after parsing it (conversion of the Javascript into a format readable by Blogger). However I am assuming that virtual Blogger beginners might be interested in this Blogger tutorial so I have broken it down into very easy and manageable steps that even the non-technically minded can follow.

Below is a detailed step by step tutorial on how to place Google Adsense within a Blogger post which will appear below the post content but above the post footer credits. The Google Adsense ad unit will not appear on the main page. The ad unit will only appear on single post pages. This means that any existing ad placement on the home page will not be affected by adding this tweak unless the number of ad units for content is exceeded (3 are allowed on any one page).

Advantages of Adding Google Adsense to Single Post Pages
Currently Blogger displays Google Adsense below the embedded comments form on a post page where Google Adsense between posts is enabled. This is an awful position in terms of revenue earning power. This tweak will add an ad unit in a much more visible spot.

It is widely held that placement of Google Adsense ad units within the post is a superior position to generate revenue so adding an additional placement of an ad unit will boost your earning power.


How Many Google Adsense Units Are Currently Displaying on Single Post Pages?
Google Adsense permits 3 Google Adsense ad units on any given post page. How many do you have displaying at present? Navigate to a single post page in your blog and check. Chances are that you will have either none or one ad unit displaying within your post content. If there is a Google Adsense ad unit it should be displaying below the embedded comments form.

You may also have Adsense widgets in your sidebar so count them too. Remember to only count the content units not the linked units as you can have up to 3 of those as well. If you have 2 or less you will be able to add this tweak without changing anything else. If you have three already counting Google Adsense widgets then you will have to make a choice about which Google Adsense placement will render the best results. In my experience Google Adsense units in lower positions in sidebars are not particularly good performers anyway so you probably won't be losing too much to eliminate these units and concentrate on adding ad units within posts.

Steps to Place Google Adsense Below Post Content and Above Post Footer Credits in Blogger
Follow Steps 1-11 if you don't have a Google Adsense ad unit.

IF YOU ALREADY HAVE A GOOGLE ADSENSE UNIT SKIP TO #12

1. From the Blogger Dashboard click on the Google Adsense link at the bottom of the page

2. Proceed to Adsense Setup > Get Ads or sign up for Google Adsense if not already

3. Choose Adsense for Content from the Ad Setup screen

4. Choose Ad unit from the Adsense for Content screen. In most cases you will want an ad unit.

5. Choose the Ad Type from the dropdown menu depending on your needs. I often select text only because I think they are better performers but you may have a different experience. Click on the Continue button

6. Choose the Ad Format. Most likely this will be between 336x280, 250x250, or the 468x60 banner sizes.

7. Choose your color palette according to your blog color scheme.


Tip: I find the best way to get the colors for my ads if I am not sure is to create an Adsense unit in Blogger and transfer that color scheme to the new ad unit in Google. Alternatively you can accept the default and change the color scheme later. Changing the color scheme won't affect your ad unit code for your template.


8. Accept the default font in the meantime unless you know the font that you need. You can always check this out later by reviewing your template

9. Click on the Continue button

10. Create an Ad Channel by clicking the link add a new channel. By default Google will add this to Your Selected Channels. Click on the Continue button

11. You may need to give your ad unit a more detailed name. I recommend keeping the dimensions of the ad unit in the name as it makes the unit easily identifiable. I usually add the name of the blog to the name because I have several blogs. Save and Get Ad Code by clicking on the Submit and Get Code button.

START HERE IF YOU HAVE A GOOGLE ADSENSE AD UNIT
12. Copy the Adsense code by right clicking the mouse while it is in the code box. Choose select all and then right click again and choose copy. Make sure you get all of the code


13. Open the Ad Converter by following this link at eblog Templates.
14. Paste the Google Adsense code into the converter and press the Convert Ad Code button. This will parse the code so that Blogger will read the Javascript properly. Leave this window open for now as we will be returning here. Note that pasting Google Adsense code in to your Blogger template that has not been parsed will produce errors

15. Login to Blogger if not already logged in

16. Navigate to Layout > Edit HTML

17. Back up your Template (recommended) by downloading it to your computer

18. Check the Expand Widgets Template checkbox

19. Bring up Blogger Search using CTRL + F. Copy and paste the following line of code into the text box to locate the block of code in your template beginning with this line:


<div class='post-footer'>


20. Return to the Ad Converter and copy the converted code by right clicking your mouse and choosing select all followed by right clicking again to copy it

21. Paste this code directly after <div class='post-footer'>


<p>
<!-- Start Google Ad-->
<!-- End Google Ad-->
</p>


22. Paste your Google Adsense ad code between <!-- Start Google Ad --> and <!-- End Google Ad -->


23. Click the Save Template button

24. Take a look at your extra Google Adsense ad unit in your blog by following the View Blog link. The ad unit will appear below the post content and above the credit lines in the post footer

Troubleshooting Your New Google Adsense Below the Post Content
  • Note only a placeholder will show up for about the first 10 minutes or so. If no placeholder appears go back and retrace your steps to make sure you haven't forgotten something. Check you have copied the code exactly.
  • If you need more white space above the ad unit add this html tag <p> before your Google Adsense code and this </p> after the last line of your Google Adsense code
  • Remember that if you have more than 3 Google Adsense ad units on a page Google will display a placeholer. If you have Google Adsense ad units in other parts of your blog you will find that only 3 Google Adsense ad units will display on one page at any one time according to Adsense rules. For this reason you may get a placeholder appearing where the ad unit would appear.

In this tutorial I have covered how to add a Google Adsense ad unit to a Blogger post below the content along with detailed instructions on how to create an Adsense ad unit at Google.

Related Articles
Bloggers Guide to Google Adsense Myths
Add Google Adsense to Blogger Header
Add Google Adsense or Banner Above Blogger Header
Better Placement of Google Adsense in Blogger
Blogger Guide to Google Adsense Placement
Google Adsense Tips for a Blogger Blog
Read Full Post ...

Thursday, August 25, 2011


Add Amazon Product Links to Blogger Posts

In this tutorial you will learn how to deep link a specific Amazon product directly into your Blogger posts so that the link will appear either on every post page or alternatively only on a selected post page. By deep linking a targeted Amazon product directly to your Blogger blog you can expect to increase your Amazon sales and to make extra money from Blogger. If you wish to learn more about adding Amazon widgets to your blog please refer to my earlier tutorial Make Money Add an Amazon Widget to Blogger


This tutorial provides you with a complete walk through of the process of adding Amazon product links to Blogger. I have rated the tutorial as moderate as it involves setting up the Amazon product link, converting the code and adding a block of code to your Blogger template. All these steps are within the capabilities of the average Blogger user provided you follow the step by step instructions below.

How to Deep Link an Amazon Product to Blogger Posts
This tutorial will show you how to add an Amazon Product Link at the foot of every post in your Blogger blog. If you want your link to appear only on a specific individual post page see Tips and Troubleshooting below for instructions.

Difficulty Level: Moderate

  1. Sign in to your Amazon Associates account. If you are not a member sign up is free to both Amazon.com and Endless.com
  2. Click on the Links and Banners tab
  3. Under the Product Links heading choose the Add Product Links Now link


  4. From the Product Links page choose your Product Category from the drop down list and enter your search keyword phrase to identify the product you wish to link to. Hit the Go button.


  5. From the search results choose the individual product you will linking to by clicking on the Get Link button on the right hand side of the product


  6. You will now be taken to the Customize and Get HTML code page.

    • Select Link Type
      By default both the product image and text link will display but you can customize it to display the image only or the text only by checking the box alongside these options
    • Customize Link
      Choose the appearance of your product. With or without a border. Choose color options to suit your blog. I suggest you keep the default setting for the link opening in a new window. Amazon lets you see a live preview of your product on the right so that you can make any adjustments before embedding the code into your blog.


  7. Once you are satisfied with the product's appearance click on the highlight code button at the foot of the page and copy the HTML code for the Amazon Product Link.
  8. Open a Javascript to HTML converter such as Centricle. Paste your code into the content window and press the Encode button
  9. Highlight and copy the code that has been converted
  10. Login to Blogger if not already logged in
  11. Navigate to Layout > Edit HTML
  12. Back up your Blogger template as a precaution
  13. Check Expand Widget Templates box
  14. There are several places you may wish your product link to appear. I have assumed for the purposes of this tutorial that you want it at the bottom of your post. Therefore find the following code in your template:


    <div class='post-footer-line post-footer-line-3'/>

  15. Directly below this line paste the converted Amazon HTML code
  16. Click on Save Template
  17. Click on View Blog to view your link at the foot of every Blogger post including the home page view.

Tips and Troubleshooting
If you are writing about a lot of different products on your blog you may need to place targeted Amazon product links on your Blogger individual post pages. To have the Amazon Product Link only appear on a specific post page follow these steps.

How To Add an Amazon Product Link to an Individual Blogger Post
Before you get started you will need to know the full URL address of your Blogger post. To get this navigate in a new window to the specific post page of your Blogger blog and copy the address from the address bar at the top of your browser

  1. Follow steps 1 to 13 as per adding an Amazon Product Link to the foot of every Blogger post.
  2. Find the following code:


    <div class='post-footer-line post-footer-line-3'/>

  3. Directly below this line paste the following code:


    <b:if cond='data:blog.url == "your blog post URL including http://"'>
    Paste your Amazon code here
    </b:if>

  4. Replace "your blog post URL including http://" with the URL address of your blog post
  5. Paste over "Paste your Amazon code here" with your converted Amazon HTML code
  6. Click on Save Template
  7. Click View Blog and navigate to the individual post page to see your Amazon Product Link at the foot of your Blogger post (Blogspot post)


In this tutorial you have learned how to add an Amazon Product Link to your Blogger posts (Blogspot posts). I have also shown you how to embed an Amazon Product Link directly into a specific Blogger post. By adding targeted Amazon product links to your Blogger blog you can expect to make extra money from your blog. I would love to hear from anyone about their experiences of adding Amazon widgets or product links to their Blogger blog so if you have the time please let me know how you get on.


Related Articles
List of How Blog Works Tutorials for Blogger Blogs
Make Money Add an Amazon Widget to Blogger
Add Chititka Ads to Blogger Blogspot Blog
Add an Affiliate Banner or Adsense Above Blogger Header
Add an Affiliate Banner to Blogger Header
Add an Affiliate Banner to Blogger Sidebar
Add an Affiliate Banner Below Blogger Post
Make Money Add Banner Ads to Blogger
5 Ways to Make Money from Blogger
Blogger Guide to Google Adsense Placement
Add Paypal Donate Button to Blogger
Blogger Guide to Google Adsense Myths
Read Full Post ...


Make Money Add an Amazon Widget to Blogger

In today's tutorial you will learn how to place an Amazon widget on your Blogger blog (Blogspot blog) to enable you to add a further income stream to your existing Blogger earnings.

Adding an Amazon widget to Blogger is not difficult. No change or very little change to your Blogger template is required. There is some time involved in setting up the widget itself and choosing the products to link to and customizing the look to match your blog however. This tutorial will walk you through the steps involved but first a few need to know facts about Amazon's affiliate program.


Important Details For Bloggers About Amazon's Affiliate Program
  • Amazon have 2 referral structures: Classic Plan and Performance Plan

    • For the Classic Plan - A flat rate commission of 4% is paid
    • For the Performance Plan - A sliding scale between 4% and 8.5% commission is paid on general product items shipped. Consumer electronics is paid at a flat rate of 4%. Kindle, MP3,video on demand and game downloads are at the rate of 10%. 
  • Sell 7 items in a month and you will receive 6% commission on sales. Sell in excess of 30 items and receive referral fees at the rate of 6.5%
  • Affiliates earn commission on the total of items shipped not just the first product bought
  • Payment options are direct credit, check or Amazon Gift Certificate. There is a $15 charge for the issue of a check.
  • Payment of referral fees is made once your account reaches $10 provided you have opted for the direct credit or Amazon Gift Certificate option. Otherwise it is $100 for a check (cheque)
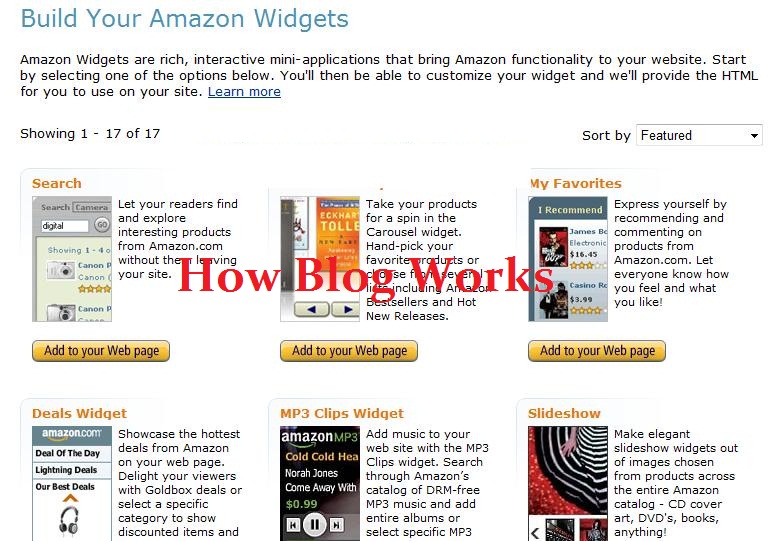
  • Amazon offer a choice of 17 different widgets
  • Amazon also offer links and banners and an astore option


Earning Money from Amazon Widgets
Linking to Amazon products on your blog can generate significant income depending on your blog topic and the type of links you choose. I personally find that my sales are not always related to blogging despite the Amazon widget on this blog linking to books about blogging. However I would strongly suggest that you try to match the products offerred to the general content of your blog so that your links are targeted to your blog's audience. Another option is to add a generic Amazon widget such as the Deals Widget to snag those bargain hunters and impulse buyers from your readership.

Placing Amazon Widgets on Blogger
There are 17 different Amazon widgets to choose from. The decision about which widget is best will partly be determined by the type of blog you have and where you want to place the widget.

I have had some success with the Carousel Widget I have found under the header to be a prime location for this gadget and as it is displayed on every page the widget is getting maximum exposure. I have also had moderate success with a sidebar location using the I Recommend widget. I think it is true to say that you will need to experiment a bit to find the best type of widget for your blog.

How to Add an Amazon Widget to a Blogger Blogspot Blog

Difficulty Level: Easy to Moderate

  1. Join Amazon's Referral Program and create an affiliate account at Amazon. You will need to supply your direct deposit details as Amazon charges to issue affiliate checks (cheques)
  2. Once your affiliate registration is confirmed (this is a fast process) you will then be ready to start to create an Amazon widget for your blog. So go ahead and login to your affiliate account at Amazon and click on the widgets tab
  3. Now comes the fun part - choosing a widget. Amazon currently have 17 different widgets to choose from. The Amazon help section is good and I suspect will answer most of your questions if you get stuck.
  4. Choose your widget. For the purposes of this demonstration let's choose a Recommended Product Links widget. Click on the Add to Your Webpage button
  5. From the drop down select a product line eg Cameras and Photo. Select a subcategory eg General Bestsellers. Click the Continue button.


  6. Select the size of widget according to the location where it will be placed on your blog eg 160x600 in the sidebar of Blogger. Click on the Select This Size button at the right of the example widget


  7. Now you will need to customize your widget. Click on Customize Link Appearance and enter link and text colors to suit your blog. Ensure that the widget opens in a new window unless you are quite happy for your readers to leave your blog. Leave this window open in the meantime as we will be returning


  8. In a new window login to Blogger if not already logged in
  9. Navigate to Layout > Page Elements
  10. Click on Add Gadget in the sidebar and choose HTML/Javascript from the list of available gadgets
  11. Copy the widget code which contains Amazon's tracking code and paste it into the content area of the gadget. Add a title if you wish. Click the Save button
  12. Use the drag and drop feature to reposition your widgets in the sidebar in the order that you want them to appear. Save any changes
  13. Click on View Blog and admire your new widget in the sidebar of your blog

Tips and Troubleshooting
Some placements of Amazon widgets will require tweaks to your Blogger template. For instance the Carousel widget which I mentioned earlier I inserted under the header in my blog. To place an Amazon widget or for that matter any widget below the header and above the first post in Blogger do the following:

  1. Login to Blogger if not already logged in
  2. Navigate to Layout > Edit HTML
  3. Find the following line of code


    <b:section class='crosscol' id='crosscol' showaddelement='no'/>

  4. Replace the no with yes and click the Save button
  5. Navigate to Layout > Page Elements
  6. You will see that you can now add a gadget below the header

In this tutorial you have learnt about adding Amazon widgets to a Blogger Blogspot blog in order to earn cash from referral fees. Most bloggers earn around 4 to 6.5% in commission for items shipped from Amazon. While not the best affiliate scheme Amazon referral fees can add up to tidy sum at the end of the month. I would recommend giving it a try. You will need to experiment to get the best fit of location and widget. Good luck and let me know how you get on.

Related Articles
Add Amazon Product Links to Blogger Posts
List of How Blog Works Tutorials for Blogger Blogs
Add Chititka Ads to Blogger Blogspot Blog
Add an Affiliate Banner or Adsense Above Blogger Header
Add an Affiliate Banner to Blogger Header
Add an Affiliate Banner to Blogger Sidebar
Add an Affiliate Banner Below Blogger Post
Make Money Add Banner Ads to Blogger
5 Ways to Make Money from Blogger
Blogger Guide to Google Adsense Placement
Add Paypal Donate Button to Blogger
Blogger Guide to Google Adsense Myths
Read Full Post ...


Add Chitika Ads to Blogger Blogspot

In this tutorial you will learn how to add a Chitika ad unit to a Blogger Blogspot blog. To put a Chitika ad unit on a Blogger blog you will need to add the Chitika ad code directly into your Blogger template. Full instructions are set out below so that even beginner bloggers and Blogger newbies can follow these to install Chitika advertising program on their blog. If you are not already signed up for Chitika read about some of the advantages of advertising with Chitika at Blogspot Blogger Guide.


Chitika and Google Adsense - A Winning Combination
One of the main questions that bloggers ask about Chitika is can it be used with Google Adsense. The answer is most definitely yes. Chitika and Google Adsense can be used in conjunction as there is absolutely no conflict because Chitika ads unlike Google Adsense are non-contextual.

By adding Chitika to your blog you will increase your revenue from pay per click advertising. The CPMs are reputed to be higher than Google Adsense making it possible depending on your blog theme to make potentially higher earnings than with Google Adsense. For those looking for the highest possible earnings the new 550x250 mega units from Chitika are a particularly good choice if you have the space to display them. Best of all the earnings payout threshold for Chitika is only $10.00 making it a very achievable target for even the most modest blogger.

How to Add Chitika Advertisements to Blogger Blogspot Blog
Following these instructions will put a Chitika ad unit at the end of your blog posts but before the post footer details.

1. Sign up with Chitika Advertising Program and set up your ad unit following the online instructions

2. Highlight and copy the premium ad code. It needs to be parsed before entering it into the Blogger template so go ahead and paste it into the code window at Centricle.com and click on the encode button


3. Login to Blogger if not already logged in

4. Navigate to Layout > Edit HTML

5. Back up your template as a precaution by downloading it to your computer

6. Check the Expand Widgets Template box

7. Find the following line of code by entering it into the search tool (Use CTRL + F)


<p><data:post.body/></p>


8. Copy the parsed Chitika code from Centricle.com and paste it into your Blogger template immediately after the above line

9. Click Save Template

10. Click on the View Blog link to view your ad unit. You will need to add the following to the end of the URL address in your browser to see your ad unit as ads are only served to North American visitors.


#chitikatest=yourkeyword

for instance I would enter

http://howblogworks.blogspot.com#chitikatest=blog

to see how my ad unit would display ads for this keyword. Don't forget to refresh your page using CTRL + R


Summary
In this tutorial you have learned how to add a Chitika ad unit to your Blogger Blogspot blog. If you would like to start taking advantage of the Chitika advertising program on your blog and earn some extra money you can sign up to Chitika by following this link.

Tips and Troubleshooting
If you want to place your Chitika ad unit in another location other than below the post it is possible to add the code directly into a gadget in which case there is no need to parse it.


Get Chitika | Premium


Related Articles
Earn Money with Chitika and Blogger
List of How Blog Works Tutorials for Blogger Blogs
Read Full Post ...


Earn Money with Chitika and Blogger

If you are looking for ways to earn money from your Blogger blog (Blogspot blog) have you considered Chitika advertising and referral program? Adding a Chitika affiliate banner to your blog is a very easy way to make extra money.

Chitika is 100% Compatible with Google Adsense
Chitika is a pay-per-click advertising program which is free to join. The greatest benefit of Chitika is that it can be used in conjunction with Google Adsense to add another way to earn money from your blog. There is no conflict with Google Adsense because Chitika only serves non-contextual ads.


Get Chitika | Premium

Chitika vs Google Adsense
Chitika claim a higher CTR (click through rate) in Chitika vs Adsense debates but I think you will have to try this for yourself. I have had good results with Chitika on the blogs I have added a mega unit to. Whether the returns are slightly higher for Chitika ads or not the most important aspect in my book is that they both can form part of your blog monetization strategy.

Easy to Monetize Your Blogger Blog with ChitikaExample of a Chitika Ad Unit
Chitika is an easy way to make money from your Blogger blog and can yield good earnings depending on your traffic source and your blog topic. Technology and gadget blogs are a particularly good fit with Chitika.

Chitika has ads for all types of content particularly product-related including including automotive, finance, health, consumer electronics, news, sports, travel to name a few.

Chitika offers a wide range of ad unit sizes including its recently introduced mega ad unit 550x250. Chitika claim that the mega unit has a higher CTR than their other Premium units. I am currently trialling this unit to see how it performs.

Best Results Using Chitika
For best results with Chitika your Blogger blog needs to receive a significant portion of its visitors from USA and Canada as ads are only served to that traffic stream. In addition your US traffic has to arrive at your blog via a search engine. No ads are displayed to non-US traffic however an alternate ad (such as Google Adsense) can be displayed if the alternate URL feature is enabled. To get the most out of Chitika therefore your blog needs to be search engine optimized.

Get Chitika | Premium

Chitika Referral Program
By adding a Chitika banner or two to your Blogger blog you can increase your blog's earning power and make extra money. For every Chitika publisher referral you make you will earn 10% of what your referrals earn. You are eligible to earn commissions for each referral for 15 months following each referral’s approval date.

Summary
In this article I have discussed the Chitika advertising and referral program and how it might be incorporated into your Blogger blog (Blogspot blog) so you can make extra money. I have explored some of the many advantages of signing up for Chitika. Why not sign up to Chitika today and start to earn extra money from your blog?
Read Full Post ...