
In this Blogger tutorial you will learn how to place a horizontal row of menu items above your first post in your Blogger blog (Blogspot blog). This process requires adding both a small amount of code to your Blogger template and a HTML/Javascript widget to your layout. This tutorial is suitable for Blogger (Blogspot) webmasters of all abilities.
Navigating a website using a horizontal menu is a traditional way to get around. On this blog for example you can see that I have tweaked Blogger to create a row of horizontal text links for easier navigation of popular pages and labels. Follow the step by step instructions below and you will be able to add a customized menu of horizontal links to your Blogspot blog as seen here.
Steps to Add a Horizontal Links Menu Above Blog Posts
1. In Blogger navigate to Design > Edit HTML
2. Locate the header style sheet section which will usually be notated as
If you can't find this line then locate the following area of your stylesheet using CTRL + F and place before these lines
3. Copy and paste the following CSS code into your template under the header section taking care not to overwrite any existing code and to include the end bracket. It is probably best to paste into the bottom of the header style sheet section so that it is easier to change the code if necessary.
4. Click on Save Template
Note: You will need to change the colors to suit the color scheme of your blog. Change every instance of color and the background color to customize to your own requirements
5. Navigate to Design > Page Elements
6. Click on Add a Gadget in the Blog Posts area. If you don't have this option already set on your template you can enable it by locating the following code and setting showaddelement to yes.
7. Select HTML/Javascript from the menu
8. Copy and Paste the following code into the Content box. There is no need to add a title. You can alter the code to suit your own needs depending on the links required.
To add a link to a label, as I did on this site, in this case Blogger Tutorials, you would enter the following:
9. Your script should be above your posts and any advertising or banners. If it is not drag it to the top position

10. Click on Save
11. Click on View Blog to see your new menu in action
Steps to Add a Horizontal Link Menu to Header
If you prefer you can add your horizontal link menu to your header instead of directly above your first post. In this case follow the steps below:
1. Follow steps 1 to 4 as for menu above first post
2. Navigate to Design > Edit HTML
3. No need to check Expand Widget Templates
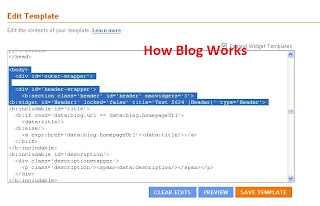
4. Locate the beginning of the body section which will be tagged as
5. Find the line:
6. Change maxwidgets from 1 to 3.
7. Click on Save Template
8. Navigate to Design > Page Elements
9. Click on Add a Gadget in the Header area.
10.Select HTML/Javascript from the menu
11.Copy and Paste the following code into the Content box. There is no need to add a title. You can alter the code to suit your own needs depending on the links required.
To add a link to a label, as I did on this site, in this case Blogger Tutorials, you would enter the following:
12. Click on Save Template
13. Click on View Blog to view the new horizontal menu in your header
Tips and Troubleshooting
To add this horizontal navigation menu to the area below the header do the following:
This Blogger tutorial has shown you how to add a horizontal links navigation menu to a Blogger blog (Blogspot blog) either in the header itself, directly above the very first post or in the area between the header and first post. In adding a navigation menu to your blog you improve the user friendliness of your blog by helping your visitors find information and posts more readily. Any questions please don't hesitate to ask.
Related Posts
List of How Blog Works Tutorials for Blogger Blogs
Navigating a website using a horizontal menu is a traditional way to get around. On this blog for example you can see that I have tweaked Blogger to create a row of horizontal text links for easier navigation of popular pages and labels. Follow the step by step instructions below and you will be able to add a customized menu of horizontal links to your Blogspot blog as seen here.
If you are using a default template you can add a menu by using the Blogger pages feature. This tutorial shows you how to manually add a top menu and add links to it.
Steps to Add a Horizontal Links Menu Above Blog Posts
1. In Blogger navigate to Design > Edit HTML
2. Locate the header style sheet section which will usually be notated as
/* Blog Header */
If you can't find this line then locate the following area of your stylesheet using CTRL + F and place before these lines
]]></b:skin></head>
3. Copy and paste the following CSS code into your template under the header section taking care not to overwrite any existing code and to include the end bracket. It is probably best to paste into the bottom of the header style sheet section so that it is easier to change the code if necessary.
/* Blog Header */


#newnavbar ul li{

font-size:100%;

list-style-type: none;

display:inline;

padding:0px;

margin:10px;

border:0px solid;

}


#newnavbar li a{

color:#335577;

}


#newnavbar li a:visited {

color: #990066;

}


#newnavbar li a:hover {

color: #99FFFF;

background: #CCFFFF;

}
4. Click on Save Template
Note: You will need to change the colors to suit the color scheme of your blog. Change every instance of color and the background color to customize to your own requirements
5. Navigate to Design > Page Elements
6. Click on Add a Gadget in the Blog Posts area. If you don't have this option already set on your template you can enable it by locating the following code and setting showaddelement to yes.
<div id='main-wrapper'>

<b:section class="'main'" id="'main'" showaddelement="'yes'>
7. Select HTML/Javascript from the menu
8. Copy and Paste the following code into the Content box. There is no need to add a title. You can alter the code to suit your own needs depending on the links required.
<div id='newnavbar'>
 <ul>
 <a href="Home Page URL">Home</a></li>
 <li><a href="URL of Your Blogger Profile Page">About Me</a></li>
 <li><a href="URL of Any Label You Choose">Label of Your Choice</a></li>
 <li><a href="URL of Any Label You Choose">Label of Your Choice</a></li>
 <li><a href="URL of Any Label You Choose">Label of Your Choice</a></li>
 </ul></div>
To add a link to a label, as I did on this site, in this case Blogger Tutorials, you would enter the following:
<a href="http://howblogworks.blogspot.com/search/label/Blogger%20Tutorials">Blogger Tutorials</a>
9. Your script should be above your posts and any advertising or banners. If it is not drag it to the top position

10. Click on Save
11. Click on View Blog to see your new menu in action
Steps to Add a Horizontal Link Menu to Header
If you prefer you can add your horizontal link menu to your header instead of directly above your first post. In this case follow the steps below:
1. Follow steps 1 to 4 as for menu above first post
2. Navigate to Design > Edit HTML
3. No need to check Expand Widget Templates
4. Locate the beginning of the body section which will be tagged as
<body>5. Find the line:
<b:section class='header' id='header' maxwidgets='1'>6. Change maxwidgets from 1 to 3.

7. Click on Save Template
8. Navigate to Design > Page Elements
9. Click on Add a Gadget in the Header area.
10.Select HTML/Javascript from the menu
11.Copy and Paste the following code into the Content box. There is no need to add a title. You can alter the code to suit your own needs depending on the links required.
<div id='newnavbar'>

<ul>

<a href="Home Page URL">Home</a></li>

<li><a href="URL of Your Blogger Profile Page">About Me</a></li>

<li><a href="URL of Any Label You Choose">Label of Your Choice</a></li>

<li><a href="URL of Any Label You Choose">Label of Your Choice</a></li>

<li><a href="URL of Any Label You Choose">Label of Your Choice</a></li>

</ul></div>
To add a link to a label, as I did on this site, in this case Blogger Tutorials, you would enter the following:
<a href="http://howblogworks.blogspot.com/search/label/Blogger%20Tutorials">Blogger Tutorials</a>
12. Click on Save Template
13. Click on View Blog to view the new horizontal menu in your header
Tips and Troubleshooting
To add this horizontal navigation menu to the area below the header do the following:
- Login in to Blogger
- Navigate to Design > Edit HTML
- Find the following lines of code:
<div id='crosscol-wrapper' style='text-align:center'><b:section class='crosscol' id='crosscol' showaddelement='no'/></div> - Change showaddelement to yes
<div id='crosscol-wrapper' style='text-align:center'><b:section class='crosscol' id='crosscol' showaddelement='yes'/></div> - To left align the menu change text-align:center to text-align:left
- Paste the code in step 3 of Steps to Add a Horizontal Link Menu Above First Post directly before the following:
]]></b:skin></head> - Save Template
- Navigate to Design > Page Elements
- Click on Add a Gadget in the new area enabled below header
- Select HTML/Javascript from the menu
- Copy and paste the code in step 8 of Steps to Add a Horizontal Link Menu Above First Post into the content area of the gadget and change links to your own requirements
- Save gadget and select View Blog to see your menu in action
This Blogger tutorial has shown you how to add a horizontal links navigation menu to a Blogger blog (Blogspot blog) either in the header itself, directly above the very first post or in the area between the header and first post. In adding a navigation menu to your blog you improve the user friendliness of your blog by helping your visitors find information and posts more readily. Any questions please don't hesitate to ask.
Related Posts
List of How Blog Works Tutorials for Blogger Blogs
No comments:
Post a Comment