
When you add a recent comments widget to a Blogger blog (Blogspot blog) using your Blogger comments feed you will encourage visitors to comment on your blog and hopefully improve blog traffic blog.
It only takes a couple of minutes to add a Recent Comments widget to Blogger. It is also easy since it requires no editing of your Blogger template. This Blogger tutorial assumes limited technical knowledge of Blogger and is mostly aimed at new bloggers and beginners although it is suitable for any Blogspot blogger looking to increase action on their blog.If you would like to add a Recent Posts Feed to your Blogger website please refer to my earlier article Add a Recent Posts Feed to a Blogger Blog (Blogspot Blog)
Below I will take you through the steps of adding a feed widget to the Blogger sidebar so that the Blogger default comments feed will be displayed there. Equally you could add this widget to the footer if you prefer.
I am going to show you two different widgets to add Recent Comments to your blog. Which you choose is up to you and largely depends on how many comments you wish to display.
Method 1 - Using the Blogger Feed Widget to
Add Recent Comments Feed to Blogger
This first method is the old way to add recent comments to Blogger using the Blogger feed widget and is still my preferred method. The limitations are though that the maximum number of comments displayed is 5.
Method 2 - Alternative Method to Add Recent Comments Feed to Blogger
There is another Blogger widget that can be added to Blogger which will display up to 10 of the most recent comments on your blog. By default it shows the author's name and this can not be removed. If you are happy with this and would like more comments displayed this is a nice widget. One problem with the widget though is it will not necessarily display in the font of your blog. You will need to check this by installing it to try it out.
Method 1 - Add a Recent Comments Feed to the Sidebar of a Blogger Blog
- Login to you Blogger blog
- From the Dashboard go to Design > Page Elements
- Click on Add a Gadget in the sidebar
- Select the Feed widget from the list of Basic Widgets
- A popup dialog box will appear requesting you to configure the URL of your feed. Enter the following text into the box labelled URL Feed substituting the URL address of your blog name eg howblogworks.blogspot.com for yourblogname:
http://yourblogname.blogspot.com/feeds/comments/default

- Click on continue. If you have entered the address of your comments URL feed correctly Blogger will retrieve your feed and display a preview in a dialog box. The feed will include links to the last five comments made on your blog.

- Unless you want less than 5 comments to display leave show 5 as is
- Under Title replace the name of your blog with Recent Comments instead
- If you want to be able to see the date of the comment check the Items Dates box
- If you want to have the comment author displayed check the Item/Sources Author
- Unless you are worried about visitors leaving your blog there is no real need to check Open in a New Window(note this option has been added since I first wrote this tutorial so it is not in the picture)
- Click on Save
- Click on View Blog to see your new Recent Comments feed in action.


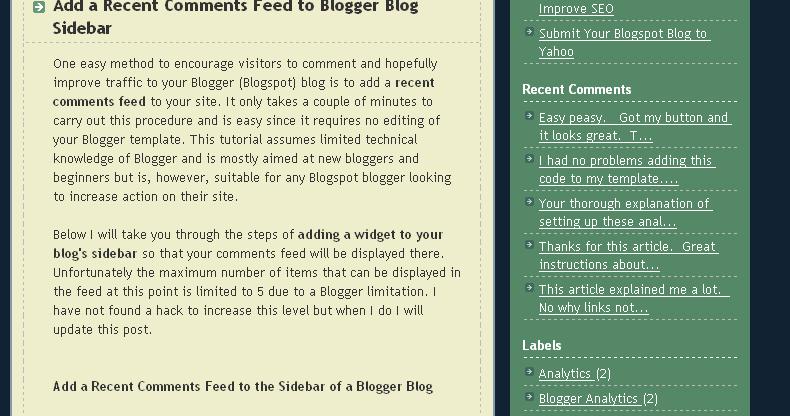
Below you can see an example of what the recent comments widget will look like. (Naturally it will be styled to suit your blog.) You can also see it operating in the sidebar of this blog.
8. If you want to change where it appears in the sidebar this can be achieved by returning to Design > Page Elements and using drag and drop to position the widget into the spot of your choice on the Blogger sidebar.
Troubleshooting
If you are using a feed delivery service like FeedBurner the default comment feed URL will be being redirected by Blogger.com. In this case you will need to enter the Feedburner address of the feed which is likely to be something like this:
http://feeds2.feedburner.com/Comments/YourSiteName
Notice how Feedburner capitalizes your blog name. Check the exact address at Feedburner if you are not sure of the feed address. For more on burning your feed at Feedburner check out these articles: Blogger RSS Feeds and Feedburner and Burn Blogger RSS Feeds at Feedburner and Add a Feedburner FeedFlare to a Blogger Feed
Method 2 - Using a Contributed Gadget to Add a Recent Comments Widget to Blogger (Blogspot)
- Login to you Blogger blog
- From the Dashboard go to Design > Page Elements
- Click on Add a Gadget in the sidebar
- Click on Most Popular from the menu on the left hand side of the Add a Gadget window
- Select Recent Comments
- Change the number of comments to display according to your individual blog requirements. The Preview box will show you what your widget will look like with less than 10 comments
- Change the Summary Length to 100 px or leave as is if you prefer

- Click on Save to activate your Blogger widget
- Click on View Blog to see your Recent Comments Widget displayed
- Use drag and drop in Design > Layout to position your widget as you desire

This Blogger tutorial has demonstrated two different methods of adding a recent comments gadget to your Blogger blog (Blogspot blog) using Blogger widgets. The recent comments widget is probably best displayed in the Blogger sidebar or it can be moved to the footer if you prefer and of course depending on your blogger template.
Related Articles
List of How Blog Works Tutorials for Blogger Blogs
Add a Recent Posts Feed to a Blogger Blog
Blogger RSS Feeds and Feedburner
Burn Blogger RSS Feeds at Feedburner
Add a Feedburner FeedFlare to a Blogger Feed
No comments:
Post a Comment